
Thirty five years ago this week, I graduated from high school.
Yikes! Is it really that long ago?
Yup. I am that old.
By most standards, we were a pretty average class. There were over 60 grade 12 students that year but I know there were a few that didn’t actually graduate. I’ve only stayed in touch with a handful of my classmates but I do occasionally here about some others through family members or other acquaintances. As far as I know, they are all still alive. Several classmates still live in the home town area. Not surprising really, given that it is a farming community. At least two of the girls married before the grad service (no they weren’t pregnant!) and quite a few married over the next year or two. There have been several divorces and remarriages.
There are a few farmers, some business owners, several teachers, nurses and at least one doctor that I know of from our class. Some are civil servants and some work in restaurants, offices or other businesses. Some were stay at home parents and quite a number of the class of ’76 are now grandparents!
I honestly don’t remember much about grad.
Grad day was hot though. I remember being glad that I had worn a sleeveless dress – even if it was floor length. There was no air conditioning in the gym or in the theatre. The grads, dates and parents went for a dinner in the gym, then went to the school theatre to pose for photographs while the gym was set up for the actual ceremony. I have a vague recollection of the school band providing some music during the ceremony, but that is about it. For the life of me I couldn’t tell you what the theme was, who did the key note address or who the valedictorian was - although I think it was one of the brainiacs!
After the formalities, the grads and dates all headed off to Winnipeg for a late night cruise on the River Rouge. That was the thing to do back in those days. The group I hung out with didn’t drink or dance but we went anyways. We were pretty much ignored most of the time but that wasn’t anything new either.
I think there was an after party at one of the students homes but my pals and I just headed back to another friends about 3AM or so. Oh, such exciting lives we led!
I dug out my old yearbook to see if I could remember anything else about grad or grade 12. What I found was a lot of old black and white photos – mostly unlabeled so, I really couldn’t identify most of them. Oh sure, there were the individual photos of all of us but many of the photos of students taking part in activities or in candid’s weren’t identified. Maybe it is better that way as I’m sure some of them would prefer not to be recognized.
Funny thing here, is that I’m not even purposely trying to be vague in recollections of people and experiences to protect privacy. I really don’t recall a lot of the things that happened back then. I wasn’t stoned and as far as I know, I still have most of my marbles. I wouldn’t know most of them to meet them on the street – and not just ‘cause I’m legally blind. I just don’t have a lot to remember about those days and the people I spent time with.
Since I was thinking back to my grad year, I thought I’d take a look back to see what life was like in our corner of the world in 1976.
We didn’t have computers or cell phones. In fact most of us still had rotary dial phones. If you lived outside of town, odds are you were on a party line. That meant that each customer had a specific ring that would signal the call was for them. It was rude to eavesdrop on other calls but lots did it anyway. Most cameras took either 35mm film rolls or a 110 cartridge. We either dropped off or mailed the films, then waited about a week or so to find out what our pics looked like! Microwaves were starting to become popular but were quite expensive. Lots of people still had the soon to be discontinued 8 tacks, although most were still using LP’s or switching to cassette to listen to recorded music.
Radio signals were pretty good in the small towns and the countryside although they did tend to get a bit fuzzy in late evening when the city stations turned down the power. It took a bit of patience and luck to get a clear signal with the antenna or positioning the radio in just the right way!
On the radio, we were listening to songs like: “Bohemian Rhapsody” (Queen); “Silly Love Songs” (Wings); “Don’t Go Breaking My Heart” (Elton John and Kiki Dee); “Oh, What A Night” (The Four Seasons); “Welcome Back” (John Sebastian); “Let Your Love Flow" (The Bellamy Brothers); “’Til The Rivers All Run Dry” (Don Williams); “Drinkin’ My Baby Off My Mind” (Eddie Rabbitt); “What Goes On When The Sun Goes Down” (Ronnie Millsap); “I’ll Get Over You” (Crystal Gayle). Sadly, disco was getting more airplay.
Only a few high end TV’s had remote controls. Most people had either a large cabinet style colour TV or a small portable TV with about a 13” screen – often in black and white! A VCR was way too expensive for most. Cable wasn’t much of an option in town and unheard of in the rural areas. In southern Manitoba, we had 4 stations – CBC English and French; CKY (now CTV) and CKND (formerly KCND in the US and now known as Global). We had to adjust the picture with the rabbit ear antennas or have someone go up on the roof to adjust a larger antenna. Some of the TV shows that we watched included: “M*A*S*H”; “Columbo”; “Barney Miller”; “Happy Days”; “Laverne & Shirley”; “Hawaii Five-O”; and “The Rockford Files”.
We went to the movies to see: “All The President’s Men”; “Family Plot”; “The Omen”; “Bad News Bears”; “Mother, Jugs and Speed”; “Murder By Death”; “Silent Movie”; and “Taxi Driver”.
Pierre Trudeau was Prime Minister and Ed Schreyer was the Manitoba Premier. Gerald Ford was the president of the USA.
Wow, things have really changed a lot in thirty five years, haven’t they?
I know we all had our own dreams and expectations of what our post high school years would bring, but I doubt that any of us imagined just how much our world would change in those ensuing years.
Life has taken each of us on a unique journey. Hopefully, we have all matured a bit along the way. Whether we want to admit it or not, most of us have gained a few pounds. We’ve likely gotten a little (or a lot) greyer and picked up a few aches and pains along the way. We’ve learned to adapt to new technology and try to embrace the challenges that day to day living can bring.
I know our class has had at least a couple of reunions over the years but I have no idea if or when there will be another one. Even if there was, I highly doubt that I would attend – I’ve just never been a fan of big gatherings or reunions. I prefer to leave that part of my past to memories – few though they may be. If perchance any of my classmates and I should cross paths, I hope you will forgive me if I don’t recognize you.
So, to the “Class of ‘76” – congrats! We’ve all come a long way!
dn
Sunday, June 26, 2011
Sunday, June 19, 2011
"Did You"
"Did you ever really love me
Did you ever really care
Did you ever really miss me
Kiss me I wonder if your heart was ever there
Did you ever dream about me
Did you ever really cry
Did you ever really love me
Or did you really tell a lie"
Those are the lyrics to a hauntingly beautiful song that aired as part of a dramatic scene on the Friday, June 10, 2011 episode of the CBS soap “The Young And The Restless”.
Soap songs are usually meant to blend into the scene – so much so, that you don’t always notice they are there. You often hear only a few seconds of any song.
But this one? Well, it was front and center and drew the audience in with every word and note! I won’t go into details about the scene that played out between the two estranged characters (Genevieve and Colin), because this post is about the song, the group that recorded it and the man who wrote it.
The questions on many of our minds were: “What is the name of this song?”; “Who recorded this?”; “Where can I get a copy of this song!?!” Like many other fans, I did lyric searches, checked various soap boards, fan pages, Twitter and read comments on YouTube clips of the scene. No one seemed to know the answer.
Was it an old song? A new song meant to sound old? Was it Genie Francis (Genevieve) singing? Could the song be from Australia (where the characters were originally from)?
I took a chance and emailed Songs Of The Soaps to see if they could track it down. Sure enough, she had an answer for me within a couple of days. I emailed the son of the composer. He responded almost immediately and has graciously allowed me to share some pics and other info about his family and the song.
The song is called “Did You” and was written by Lew Morrison. It was recorded by the Morrie Morrison Orchestra Featuring Alyce Hauser. Lew was the son of Morrie and Alice Nadine (Lanterman) Morrison.
Morrie (1888-1984) and Alice (1892-1978) were musicians and entrepreneurs in Washington state, but also spent some time in California before moving back to the Seattle area. Morrie was a composer, musician and an avid dance instructor. He ran several dance halls and dance instruction studios. He also produced stage shows and tried his hand at movie making. Alice was a musician, song plugger and song writer. "Say You'll Be Mine (My Love Is All For You)" was the first of several hits she had in the 1920’s. In 1944, her song "Goodbye, Little Girl, Goodbye" was picked up by the Ink Spots and The Andrews Sisters recorded "Please Don’t Sing That Song Again" in 1946.

Morrie and Alice created the Morrison Music Company to produce sheet music and recordings for their songs. Morrie founded one of the first recording studios in the Seattle area – Morrison Records. The company not only recorded their own compositions but also several local amateur musicians. Morrison Records didn’t just record the songs but also pressed their own recordings. These became real collector items as many of them were multi-coloured.

The Morrie Morrison Orchestra consisted mainly of Morrie on drums, Alice on piano or organ and Lew on guitar. Other musicians were hired to play violin, accordion or whatever instruments were needed to fill out the desired sound. The orchestra worked mostly as a studio recording group but occasionally did perform at some of the dance halls in the Seattle area in the 1930’s and 1940’s.

Their son Lew (1913-1995) was also an active member of the orchestra and the recordings. Lew Morrison wasn’t as prolific a songwriter as his parents, but according to his son Ken, the song “Did You” was written and recorded sometime in the 1940’s. This was also one of his dads favourites! He doesn’t know that there was any specific relationship that inspired his dad to write this beautiful, haunting piece. Ken, who is also a musician, got to perform it with him many times.
Unfortunately, nothing is known of the vocalist, Alyce Hauser, as this is the only recording she did with the orchestra.
So, how did The Young And The Restless get the song and how did Ken feel about it?
“I have a business in source music placement. It started with just my original compositions...but a friend suggested I include some of my dad and grandparents music. The libraries I work with were excited about getting these old recordings. The thing that was special about the Y & R placement was the fact that usually these songs are used for :10 - :20 ...With DID YOU they were able to weave it into the storyline and played nearly the entire song (3:00) without anyone talking over it. This is unheard of in the placement world. I was thrilled. Somewhere I know my dad was smiling.”
I asked Ken if there was anything else he’d like to add:
“I was able to play music with my grandparents and my dad from the time I was a kid. This is something that really meant the world to me. My grandfather recorded me and made a record of me reading some of his novelty lyrics when I was just 7 years old. I was the only kid in my grade school who had his own record!”
If you would like to get your own copy of “Did You”, please email: morrisonmusic@comcast.net
Ken has had a CD (professionally labelled and packaged) made of the single and will send it to you for $4.00 (includes shipping within the USA). If you are outside of the USA, it will cost a bit more for shipping but Ken will let you know the details and where to send your money and mailing address when you email him.
And yes, somewhere Lew is smiling – knowing that so many people are hearing and loving his music!
dn
Sunday, June 12, 2011
Hoisin Glazed Pork
I came across the original recipe for this dish on the Taste Of Home site a few months ago and decided to give it a try – with my own version of course! I added some red pepper strips and crushed garlic. I’ve also tried this recipe using boneless skinless chicken breasts rather than the pork loin chops. Either of the meats work well here and make a very tasty entre.
Hoisin Glazed Pork

1 tablespoon Dijon mustard
1 tablespoon Hoisin sauce
1 tablespoon oyster sauce
1 tablespoon honey
1 teaspoon reduced-sodium soy sauce
1/2 teaspoon minced fresh gingerroot*
1/2 teaspoon minced garlic (bottled type from produce section)
2 boneless pork loin chops (1/2 inch thick and 5 ounces each)
3 green onions, cut into 2-inch pieces
2 tablespoons thinly sliced red pepper strips (about 1” long)
In a small bowl, combine the first seven ingredients. Sauce will be quite thick. Dip the pork chops in the sauce and turn to lightly coat with sauce. Place pork in a shallow 1-qt. baking dish coated with cooking spray. Stir the green onions and red pepper strips into the sauce to coat and then pour sauce over pork. Let marinate for 15-20 minutes at room temp or covered in fridge up to two hours.
Bake, uncovered, at 400° for 15-20 minutes or until a meat thermometer reads 160°.
Serve with brown rice and a green vegetable. Yield: 2 servings.
*I buy a small piece of gingerroot, peel it and then wrap in plastic wrap and store in freezer until I need it for a recipe. You don’t have to thaw it to grate it. It grates quite easily while frozen. Got this tip from Rachael Ray.
Note that ingredients can easily be multiplied to make additional servings.
Enjoy!
dn
Sunday, June 5, 2011
Storage Cubes
A few weeks ago, I shared the frustration of trying to put together a mobile file cabinet with minimal instructions. So, you’d think I’d have learned not to buy things without checking for instructions first, right?
Well, not really as I’d bought two sets of these Rubbermaid Storage Cubes about a month before I bought the cabinet. I hadn’t opened these yet as I didn’t intend to assemble them until I had the oak wardrobe in here. I had planned to put the cubes inside the wardrobe to store clothes from my dressers in. There is a rod inside the wardrobe for hanging things, but the depth of the wardrobe was not sufficient for my non slip hangers unless they hung at an angle. That would have severely limited the amount I could hang. I decided that I was better off to leave things hanging in the built in closet and use the wardrobe for cube storage.
I spent quite awhile looking for something solid, yet reasonably priced that would fit inside. I finally settled on the Rubbermaid cubes as they were sturdy, durable and a name brand with a good reputation. They were also on sale.

So they sat in the packaging for about a month before I opened them. It just so happened to be the same week that I attempted the cabinet assembly.
When I did open the package I was dismayed to see the lack of instructions:

Yup, that was it! One drawing. Oh goody! I looked online but found only the assembled picture on sites that were selling the cubes. I couldn’t even find the cubes on the Rubbermaid site!
I made several attempts but no matter what I tried, the pieces always popped apart. I tried several times over several days but nothing seemed to work! I was beginning to wonder if I had wasted my money and that I would have to buy something else. Of course, after I’d bought the cubes and before I opened them, I did see collapsible storage boxes on sale at a local office supply store. They also would have worked well. I didn’t buy them though as it was past the date to return the cubes. I was stuck with these and I’d somehow have to figure out a way to make them work!
For awhile, I wondered if this was one of those two person jobs, so when my gal pal came to help me assemble the cabinet, we tried putting these together to.
No such luck. It was a true effort in frustration.
The next day, I was sitting here at the computer, when I had one of those proverbial light bulb moments! The diagram had shown connecting a corner at a right angle, but what if I attached the corner pieces on a back panel and then built up?
It took quite a bit of time and I still had some pieces pop off as I went along. I took several breaks to keep from getting too frustrated and to think through what the most logical next move would be, but I finally got one set put together. I also took time to make notes on how I did it as I went along. That way, the second set would go together much more easily.
I waited a couple of days before attempting the second one. I refined my notes as I went along and also took pictures so that I could show you how I did it!
Putting together Rubbermaid Storage Cubes:
Through previous trial and (much) error, I knew I had to start with a back panel as the rounded sections of the connectors are the hardest to get in properly. It finally dawned on me that I if I laid the back panels on the floor, I could use the wall and my feet as supports/braces to push the pieces against as I tried to put it together. By far the hardest pieces to get into place would be the four back connectors that are used between the second and third shelves as they have to lock in four or five places. The panels and connectors "popped" a number of times and pieces did fly off but they eventually stayed together.
I also had to gently use a hammer on a number of places to give more pressure to locking the pieces into the little grooves in the connectors. Once they are locked in properly, they don't come out to easily. I know this because when I was putting the first set together, I accidently put a panel where it should have been open and it was a real pain to get it out without the whole thing falling apart!
Putting the second set of cubes together went much more smoothly than the first and was done in under an hour – including making notes and taking pictures.
1. Start with the back panel on the bottom shelf and attach all four connector discs.

2. Using your feet to push against the corner connectors, carefully push each of the four side panels into the connectors of the first back panel.

3. Attach the connectors to the top of the first layer. Again, use your feet as a brace as the connectors on the bottom can still pop out.

4. Using the wall as a brace, push the second back panel into the connectors of the bottom cube and then attach the two back connectors for the middle cube.

5. Add in the two side panels and the next top panel. Then add the next two top connectors.

6. Add the back panel of the top layer and then the two side panels.

7. Attach the back connectors to the top layer.

8. Then add the top panel.

9. Finally add the two front connectors and ensure that all pieces are solidly locked into place.

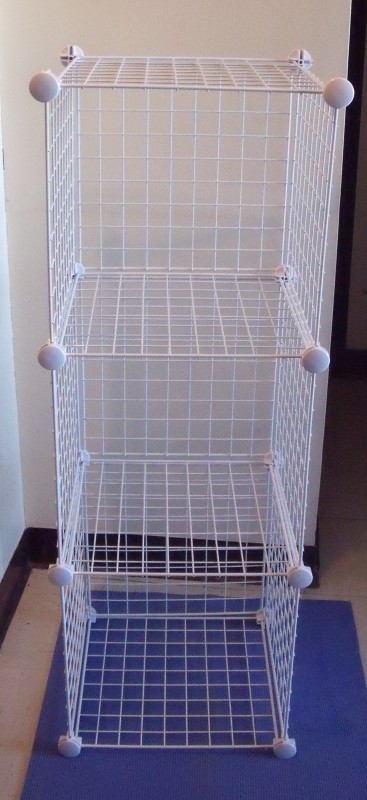
Like I said, pieces will more than likely "pop" off at various times but if you persist it will eventually stay in place. It may be necessary to use a hammer to tap the connectors and panels together - especially in the middle section.
The two sets of cubes give me lots of shelving space in my oak wardrobe. Of course they can be used for any number of other purposes and are a versatile, inexpensive addition to any space.

dn
Well, not really as I’d bought two sets of these Rubbermaid Storage Cubes about a month before I bought the cabinet. I hadn’t opened these yet as I didn’t intend to assemble them until I had the oak wardrobe in here. I had planned to put the cubes inside the wardrobe to store clothes from my dressers in. There is a rod inside the wardrobe for hanging things, but the depth of the wardrobe was not sufficient for my non slip hangers unless they hung at an angle. That would have severely limited the amount I could hang. I decided that I was better off to leave things hanging in the built in closet and use the wardrobe for cube storage.
I spent quite awhile looking for something solid, yet reasonably priced that would fit inside. I finally settled on the Rubbermaid cubes as they were sturdy, durable and a name brand with a good reputation. They were also on sale.

So they sat in the packaging for about a month before I opened them. It just so happened to be the same week that I attempted the cabinet assembly.
When I did open the package I was dismayed to see the lack of instructions:

Yup, that was it! One drawing. Oh goody! I looked online but found only the assembled picture on sites that were selling the cubes. I couldn’t even find the cubes on the Rubbermaid site!
I made several attempts but no matter what I tried, the pieces always popped apart. I tried several times over several days but nothing seemed to work! I was beginning to wonder if I had wasted my money and that I would have to buy something else. Of course, after I’d bought the cubes and before I opened them, I did see collapsible storage boxes on sale at a local office supply store. They also would have worked well. I didn’t buy them though as it was past the date to return the cubes. I was stuck with these and I’d somehow have to figure out a way to make them work!
For awhile, I wondered if this was one of those two person jobs, so when my gal pal came to help me assemble the cabinet, we tried putting these together to.
No such luck. It was a true effort in frustration.
The next day, I was sitting here at the computer, when I had one of those proverbial light bulb moments! The diagram had shown connecting a corner at a right angle, but what if I attached the corner pieces on a back panel and then built up?
It took quite a bit of time and I still had some pieces pop off as I went along. I took several breaks to keep from getting too frustrated and to think through what the most logical next move would be, but I finally got one set put together. I also took time to make notes on how I did it as I went along. That way, the second set would go together much more easily.
I waited a couple of days before attempting the second one. I refined my notes as I went along and also took pictures so that I could show you how I did it!
Putting together Rubbermaid Storage Cubes:
Through previous trial and (much) error, I knew I had to start with a back panel as the rounded sections of the connectors are the hardest to get in properly. It finally dawned on me that I if I laid the back panels on the floor, I could use the wall and my feet as supports/braces to push the pieces against as I tried to put it together. By far the hardest pieces to get into place would be the four back connectors that are used between the second and third shelves as they have to lock in four or five places. The panels and connectors "popped" a number of times and pieces did fly off but they eventually stayed together.
I also had to gently use a hammer on a number of places to give more pressure to locking the pieces into the little grooves in the connectors. Once they are locked in properly, they don't come out to easily. I know this because when I was putting the first set together, I accidently put a panel where it should have been open and it was a real pain to get it out without the whole thing falling apart!
Putting the second set of cubes together went much more smoothly than the first and was done in under an hour – including making notes and taking pictures.
1. Start with the back panel on the bottom shelf and attach all four connector discs.

2. Using your feet to push against the corner connectors, carefully push each of the four side panels into the connectors of the first back panel.

3. Attach the connectors to the top of the first layer. Again, use your feet as a brace as the connectors on the bottom can still pop out.

4. Using the wall as a brace, push the second back panel into the connectors of the bottom cube and then attach the two back connectors for the middle cube.

5. Add in the two side panels and the next top panel. Then add the next two top connectors.

6. Add the back panel of the top layer and then the two side panels.

7. Attach the back connectors to the top layer.

8. Then add the top panel.

9. Finally add the two front connectors and ensure that all pieces are solidly locked into place.
Like I said, pieces will more than likely "pop" off at various times but if you persist it will eventually stay in place. It may be necessary to use a hammer to tap the connectors and panels together - especially in the middle section.
The two sets of cubes give me lots of shelving space in my oak wardrobe. Of course they can be used for any number of other purposes and are a versatile, inexpensive addition to any space.

dn
Subscribe to:
Posts (Atom)


