Sunday, June 12, 2011

Hoisin Glazed Pork

I came across the original recipe for this dish on the Taste Of Home site a few months ago and decided to give it a try – with my own version of course! I added some red pepper strips and crushed garlic. I’ve also tried this recipe using boneless skinless chicken breasts rather than the pork loin chops. Either of the meats work well here and make a very tasty entre.

Hoisin Glazed Pork

1 tablespoon Dijon mustard
1 tablespoon Hoisin sauce
1 tablespoon oyster sauce
1 tablespoon honey
1 teaspoon reduced-sodium soy sauce
1/2 teaspoon minced fresh gingerroot*
1/2 teaspoon minced garlic (bottled type from produce section)
2 boneless pork loin chops (1/2 inch thick and 5 ounces each)
3 green onions, cut into 2-inch pieces
2 tablespoons thinly sliced red pepper strips (about 1” long)

In a small bowl, combine the first seven ingredients. Sauce will be quite thick. Dip the pork chops in the sauce and turn to lightly coat with sauce. Place pork in a shallow 1-qt. baking dish coated with cooking spray. Stir the green onions and red pepper strips into the sauce to coat and then pour sauce over pork. Let marinate for 15-20 minutes at room temp or covered in fridge up to two hours.

Bake, uncovered, at 400° for 15-20 minutes or until a meat thermometer reads 160°.

Serve with brown rice and a green vegetable. Yield: 2 servings.

*I buy a small piece of gingerroot, peel it and then wrap in plastic wrap and store in freezer until I need it for a recipe. You don’t have to thaw it to grate it. It grates quite easily while frozen. Got this tip from Rachael Ray.

Note that ingredients can easily be multiplied to make additional servings.

Enjoy!

dn

Sunday, June 5, 2011

Storage Cubes

A few weeks ago, I shared the frustration of trying to put together a mobile file cabinet with minimal instructions. So, you’d think I’d have learned not to buy things without checking for instructions first, right?

Well, not really as I’d bought two sets of these Rubbermaid Storage Cubes about a month before I bought the cabinet. I hadn’t opened these yet as I didn’t intend to assemble them until I had the oak wardrobe in here. I had planned to put the cubes inside the wardrobe to store clothes from my dressers in. There is a rod inside the wardrobe for hanging things, but the depth of the wardrobe was not sufficient for my non slip hangers unless they hung at an angle. That would have severely limited the amount I could hang. I decided that I was better off to leave things hanging in the built in closet and use the wardrobe for cube storage.

I spent quite awhile looking for something solid, yet reasonably priced that would fit inside. I finally settled on the Rubbermaid cubes as they were sturdy, durable and a name brand with a good reputation. They were also on sale.

So they sat in the packaging for about a month before I opened them. It just so happened to be the same week that I attempted the cabinet assembly.

When I did open the package I was dismayed to see the lack of instructions:

Yup, that was it! One drawing. Oh goody! I looked online but found only the assembled picture on sites that were selling the cubes. I couldn’t even find the cubes on the Rubbermaid site!

I made several attempts but no matter what I tried, the pieces always popped apart. I tried several times over several days but nothing seemed to work! I was beginning to wonder if I had wasted my money and that I would have to buy something else. Of course, after I’d bought the cubes and before I opened them, I did see collapsible storage boxes on sale at a local office supply store. They also would have worked well. I didn’t buy them though as it was past the date to return the cubes. I was stuck with these and I’d somehow have to figure out a way to make them work!

For awhile, I wondered if this was one of those two person jobs, so when my gal pal came to help me assemble the cabinet, we tried putting these together to.

No such luck. It was a true effort in frustration.

The next day, I was sitting here at the computer, when I had one of those proverbial light bulb moments! The diagram had shown connecting a corner at a right angle, but what if I attached the corner pieces on a back panel and then built up?

It took quite a bit of time and I still had some pieces pop off as I went along. I took several breaks to keep from getting too frustrated and to think through what the most logical next move would be, but I finally got one set put together. I also took time to make notes on how I did it as I went along. That way, the second set would go together much more easily.

I waited a couple of days before attempting the second one. I refined my notes as I went along and also took pictures so that I could show you how I did it!

Putting together Rubbermaid Storage Cubes:

Through previous trial and (much) error, I knew I had to start with a back panel as the rounded sections of the connectors are the hardest to get in properly. It finally dawned on me that I if I laid the back panels on the floor, I could use the wall and my feet as supports/braces to push the pieces against as I tried to put it together. By far the hardest pieces to get into place would be the four back connectors that are used between the second and third shelves as they have to lock in four or five places. The panels and connectors "popped" a number of times and pieces did fly off but they eventually stayed together.

I also had to gently use a hammer on a number of places to give more pressure to locking the pieces into the little grooves in the connectors. Once they are locked in properly, they don't come out to easily. I know this because when I was putting the first set together, I accidently put a panel where it should have been open and it was a real pain to get it out without the whole thing falling apart!

Putting the second set of cubes together went much more smoothly than the first and was done in under an hour – including making notes and taking pictures.

1. Start with the back panel on the bottom shelf and attach all four connector discs.

2. Using your feet to push against the corner connectors, carefully push each of the four side panels into the connectors of the first back panel.

3. Attach the connectors to the top of the first layer. Again, use your feet as a brace as the connectors on the bottom can still pop out.

4. Using the wall as a brace, push the second back panel into the connectors of the bottom cube and then attach the two back connectors for the middle cube.

5. Add in the two side panels and the next top panel. Then add the next two top connectors.

6. Add the back panel of the top layer and then the two side panels.

7. Attach the back connectors to the top layer.

8. Then add the top panel.

9. Finally add the two front connectors and ensure that all pieces are solidly locked into place.


Like I said, pieces will more than likely "pop" off at various times but if you persist it will eventually stay in place. It may be necessary to use a hammer to tap the connectors and panels together - especially in the middle section.

The two sets of cubes give me lots of shelving space in my oak wardrobe. Of course they can be used for any number of other purposes and are a versatile, inexpensive addition to any space.

dn

Sunday, May 29, 2011

The Oak Wardrobe - Part 2

In my last post, I told you how a beautiful old oak wardrobe came into our family. After my grandma moved to a seniors home in 1981, my mom was next in line to have the new family heirloom.

The wardrobe was once again moved. This time it went out to my parents farm and sat in their sunroom. It has been admired there for almost thirty years. My parents also received a few offers to sell the piece but always said no.

Since my mom recently moved to an assisted living facility, it is now my turn to have this beautiful old piece of furniture to love, admire, care for and store my treasures in.

I wasn’t around during the last time it was moved, but mom said it could be taken apart to move. She said that it came apart in at least three pieces so that would make it a bit easier to move – bulky and awkward but not heavy. Even so, I still had no idea how I was going to get it back to my suite here in the city. I’d been trying to find someone I could barter with (baking and gas money for the move and reassembly) to help move it for a couple of months already but no luck. I didn’t know anyone with a half ton that could also do lifting. Hiring a mover would cost at least a couple of hundred dollars by the time you added in time and mileage – which I couldn’t afford - but I knew the piece was worth way more than that. I’d loved and admired this piece since I was a kid and I wasn’t about to let someone else have it!

What was I to do? As I mentioned in a recent post, I went out to the farm to sort through things a few weeks ago. While we were out there, my brother came in and said that he thought he might be able to get it in his SUV depending on the measurements. He measured it and decided that it would just fit. He started to take it apart and realized that it was almost all tongue and groove construction with just a handful of screws and hardware. He got it into four manageable pieces and my friend and he carried it out to his vehicle!

Two days later, he brought it into the city. With the help of another of my gal pals, they brought it into my building and assembled it in my bedroom.

Yes, it may be a bit big for my small bedroom, but I got rid of both of my dressers to make room for it! What can I say? I LOVE it!!

My gal pal that went with me to the farm, knows a bit about antiques and thinks that this may be over 100 years old. Many furniture pieces of that time were done in tongue and groove construction to make it easier for moving. Also many homes of the era had little storage space so this type of wardrobe was very popular. It may or may not have been painted when it was first made.

Personally, I’ve always loved the look of a natural wood finish and never really understood why there was such a fascination and trend with painting perfectly good wood. I remember asking my grandma why they painted furniture. I seem to recall her saying something along the lines of this: During the great depression, there wasn't the money to fix things up and then during WW2, there was such a scarcity of everything including paint as almost everything went to the war effort so things just got rather dull looking. After the war there was such a focus on renewal and freshening up things that everything that could be painted was painted - including perfectly good woodwork and wooden furniture. She also said that the brighter colours were a welcome edition in areas where there were nightly blackouts during the bombings.

Painted wood furniture has always been popular ... even before the war years. In some cases, it was done for the artwork and for others it was seen as a way to hide the flaws of lesser quality wood. When people were poor and couldn't afford high end wood they would resort to painting their wood to make a room brighter and cheerier.

When we were reassembling the wardrobe here, we looked for any markings that would tell us who made it and when, but we never found one. Somewhere along the line, this info was removed either by flood waters or through painting/refinishing. That really is too bad, as it would be interesting to know more of the history of the piece. It would be kind of neat to know where all it has been and the treasured possessions it has held over the years.

I’ve only had the wardrobe for a few weeks now, but it is truly treasured!
I find myself admiring its beauty and touching the oak, wondering what stories it could tell. Growing up, I didn’t get to see the wardrobe often. In fact I only saw it a few times when the upstairs suite in my grandparents house was between renters. Still, I used to wonder if other kids had played near it and dreamed of finding a secret door at the back that led to a land such as Narnia.

Actually, I still wonder about that! I also wonder what kind of clothes and other possessions had been stored in it? Did they store everyday clothes, fancier wear for going out or did they use it the way my parents did – for coats, hats and gloves? Where was it during WWI and WWII? How about during the roaring twenties and the dirty thirties?

Truth is, we will never know any of the history of where the wardrobe originally came from or how the church got it, but I for one am thrilled that they were willing to part with it for such a small amount all those years ago!

And just in case you were wondering, NO it is not for sale!!

dn

Sunday, May 22, 2011

The Oak Wardrobe - Part 1

My maternal grandparents moved around a fair bit in the early years of their marriage. He was an agricultural rep and she was a home economist. They moved from town to town and traveled throughout the Canadian prairies teaching farming and homemaking techniques. When my mom was young, they lived in the town where she met and married my father. My mom’s sister also settled in that town and a brother eventually settled in Winnipeg. So, in 1956 when my grandparents decided to retire and set down more permanent roots, they moved back to the town where my mom and aunt lived. That kept them close to three of their four children and most of the grandkids. The other son and his family lived in Quebec but they visited back and forth whenever possible.

My grandparents bought a house in town – coincidently right next door to the one they had lived in back in the late 1930’s and early1940’s and where my parents were wed. The house was larger than they needed so my grandpa converted the upstairs to a self contained apartment that they could rent for a bit of extra income. This, of course was a rather old house – the kind of house that had little closet space - so storage was always an issue despite a fair bit of space. My grandpa was quite a handyman, so he built a wall of floor to ceiling cupboards for his and grandma’s bedroom on the main floor. He also built kitchen cabinets for the small galley style kitchen.

Now this town was also along a river that had a nasty habit of flooding on a rather regular basis in the spring. Parts of the town always seemed to be flooded every time, but the people would band together and work to clean and restore as much as possible. The church that my grandparents were active in was part of that low area near the river – as was their house.

One of those floods – no one remembers which one now - somewhere between 1956 and about 1967, there was a flood that caused the basement of the church to be flooded. My grandfather was helping with the cleanup. Some items were saved and others were deemed beyond recovering and were to be thrown out. Among the items to be thrown out was an old oak wardrobe.

The wardrobe was large at 80” high, 44” wide and 18” deep, but wasn’t ornate. It had two doors with a simple knob to open the panel on the right side. The left side was held shut by a hook and latch at the bottom on the inside. There was a rod inside for hanging clothes. There was enough space from the rod to the floor to hang full length dresses or coats. Under the closet section of the wardrobe, was one large drawer that ran almost the width of the cupboard. There was plenty of room for storage in this old wardrobe.

It had been through the flood and was not in great shape. No one thought it was worth saving.

My grandfather thought otherwise and offered to donate $10 to the church for the wardrobe. That was a lot in those days and the donation was gratefully accepted. With the assistance of another church member, my grandfather took the flood weary wardrobe back to his house about a block or so away. Over the next few weeks, my grandpa cleaned up the wardrobe as best he could. What he found, was a well made, sturdy piece of functional furniture that still had many years ahead of it if it were cared for. He and my grandmother decided to paint it an off-white with a speckled effect (popular at the time) and put it in the apartment on the second floor.

Both my mother and I fell in love with this wardrobe and said that we would eventually like to have it. My grandfather died in 1970 and my grandmother continued to rent the suite upstairs for several more years.

A few years after grandpa died, one of the tenants took it upon herself to strip and restore the wardrobe to the bare wood – without obtaining consent! My grandmother was unaware of this as she rarely went up to the suite. She only learned of the misdeed when the tenant gave notice to move and asked if she could buy the wardrobe!

Grandma was livid! How dare someone do something like that without consulting the owner! She made it very clear to the tenant that the wardrobe was NOT for sale at any price as it was now a family heirloom and would be passed down within the family. Family members had already spoken for it many years ago. The tenant was not happy but had no further right to pursue the matter. Like I said, grandma was furious but mom and I assured her that we were THRILLED! We had planned on eventually stripping it when grandma passed it to us so were glad we didn’t have to do it! Besides, the tenant had done a wonderful job!

Well, my grandma only had a couple of tenants after that before she had it moved downstairs to her part of the house. She moved to a seniors home in 1981 and the house was eventually sold.

dn

Next Post: The Oak Wardrobe (Part 2)

Sunday, May 15, 2011

Sorting Treasures

Just over a year ago, I wrote a post about spring cleaning and how hard it was. I also shared a story about sorting things at my grandma’s home after she moved to an assisted living facility. I said that my siblings and I would eventually have to sort through our mother’s things as well.

Well, that time has come. A few months ago, my mom moved to the same facility that my grandma spent her last days in. My mom spent 66 1/2 years on that farm. All but the last 7 were with dad there as well.

Over the last few years, us kids have been trying to get mom to sort through things so there wasn’t as much for us to go through. But, after so many years there and with failing health, mom just wasn’t up to parting with much from the past. Everything had memories and sentimental value attached.

We all knew that eventually this was going to happen and that it would be us kids who did the bulk of the sorting and the inevitable questioning of “What on earth was mom thinking saving THIS?”

Like my grandma, my mom had also started keeping a list of things she had and who had given them to her and dad. She also asked each of us kids and the grandkids what items we would like to have when the time came. It was a good start but there was so much more.

I’d slowly been making my own list of things that I wanted from the farm. When mom and I had our weekly talks I’d mention things that I’d like to have and she’d make a note of it and also tell me to write it down in my own list.

So, a few weeks ago, on a cool morning in late March, one of my gal pals and I headed out on a road trip to the farm so I could sort through the things I wanted to have. It felt a bit strange to be going there after so many years. It would be even stranger to be going through things without mom there.

In many ways, the place was exactly as I remembered it. It also felt very different.

My siblings had already cleaned out the fridge and some of the other items from the living room and bedrooms. They had moved several items to mom’s new home and also gotten a few of the things they wanted.

I had mailed a list of things I wanted to them a few weeks earlier so they would know what I was interested in having. I didn’t expect them to pack for me but I did ask them not to throw things out from the kitchen (aside from the fridge contents) before I got a chance to go through things. I knew that aside from a few books and other mementos, the bulk of what I wanted would be from the kitchen.

Going through things wasn’t going to be easy, but I knew I only had a few hours so did my best to stay focused on the list and not on the sentimental value. After all, there was only so much that I could take home with me to fit into my small apartment. For the most part, my mom had kept things in the same places she always had so it was fairly easy to find many of the things on my list.

I found my old high school yearbooks, some cookbooks and a few other books that I had given my parents over the years. There were a few pictures and mementos that I wanted to have. I found the old folding step stool that my mom got in the early seventies. (more on it in a future post). I came across a few things I’d forgotten about. Things I didn’t realize that mom still had. I didn’t have time to go through all the closets, bedrooms and other nooks and crannies where mom stashed her treasures. I hit the spots that I knew I would be most apt to find the things that I knew I wanted.

I spent the most time in the kitchen. We sorted through the items still in the pantry. I went through mom’s seemingly endless collection of Tupperware and other plastic storage items.

I told my friend stories about things as I came across them. She has grown up with many of the same things in her home so it was easy for her to relate to a lot of the things.

So what other treasures did I bring home with me?

I found the Wear-Ever cookware that my mom had always used! I loved that stuff and have a few pieces that mom and I picked up at garage sales many years ago when I was first starting out on my own. They don’t make pots like that anymore! I took the blender that my parents got on their 25th anniversary in 1969. I grabbed the old heart shaped cake pans that mom used to bake a layer cake in for birthdays or for Valentine’s Day. I found the set of measuring spoons that looked like little shovels. I loved using them to measure things for recipes! I got the 1 1/2 quart Corning Ware dish and lid that had come from grandma’s.

I’d forgotten about the six Sylvester coffee mugs that mom and I had found at a variety store many years ago. There was a set of eight drink glasses from the bar cabinet. I also nabbed the remaining contents of several bottles of liqueurs to use for desserts and other recipes. Okay, some may also be used for a drink or two!

I came across a set of stainless steel mixing bowls that mom had won in a curling bonspiel a long time ago. I found the tall set of wooden salt and peppers that I had bought for mom when I was a teenager.

One of the treasures that I really wanted was the rectangular pie pans! Yup, rectangular! Mom doesn’t remember where or when she got them, but says they were quite popular in the 1950’s and she had them before I was born! They make the equivalent of a regular round pie – just in a rectangular shape that was designed to save on oven space. The end pieces just had an extra side of crust! I don’t make pies, but these are great for baking things like a pork tenderloin or a slab of ribs in. They are also handy for baking any number of other desserts or baked items if you have limited oven space. I’d gotten one from mom many years ago but she had two more – and I had dibs on them!

We only touched the surface of things in the farm house that day, but I found most of the things on my list and a few other forgotten treasures. About a week ago, I got out for one more short exploration of the farm house and found a few more lost treasures, I left a short list of things I’d still like if my siblings find them. I don’t know if I’ll make it out again before they finish sorting or not.

Oh, there was one more item that I’ve been waiting to get since I was a young girl, but I’ll write about that in another post!

dn

Sunday, May 8, 2011

Going Home

They say you can’t go home again.

Of course, you can always take a trip down memory lane any time you want. Granted, over time memories will fade and the truth of the past can become blurred. We tend to either have very strong memories of the past or vague recollections.

Assuming the physical home is still there, it just may be possible to go back....

I spent all of my formative years on the family farm. I left after high school for a few years but returned for two and a half years in my early twenties. It wasn’t easy to go back after being on my own, but I was broke and needed that time to get going again.

I left again in 1984 and have been in Winnipeg ever since. In those first years after I moved to the city, I went home for weekends as often as I could. Usually every two or three weeks. I enjoyed seeing my friends and spending time with my parents and some of my family who were nearby.

Bus fare was fairly reasonable back then and there were at least two buses in and out of Winnipeg every day. I’d go out on Friday and come back on Sunday evening or Monday morning. For at least a couple of years, it was usually the same bus driver that I travelled with when I went out. If he saw me waiting at the depot here in the city, he’d hold the front seat on the door side for me or even let me on first. We’d chat most of the trip. It made the time go faster. If I told him which bus I was likely to take back and he was driving, then he would try and hold the same seat for me till he got to my stop.

Occasionally, I’d take laundry with me but usually I took out less than I brought back! I always tried to leave room to bring more back. In the summer and fall, I’d bring produce from our garden or new treasures from garage sales. In the winter, mom and I would often bake and cook together so I could bring homemade food back to the city with me. I didn’t have fully equipped or spacious kitchens in those early days!

Mom and I would usually go shopping in a nearby town on Saturday. We hit the garage sales and any sales in the local stores. It was a time to catch up and chat about all kinds of things. On Sundays, we’d cook an early dinner and I’d pack leftovers to bring back with me.

If I wasn’t spending time with friends in the evenings, my parents and I would sometimes play cards or board games. Dad and I would always have a game or two of cribbage. I’d always take at least one long walk around the farm and down the road apiece just to stretch my legs and have a time of peaceful solitude to contemplate whatever was on my mind.

After losing so much of my sight in 1990, going to the farm for a weekend was never the same. My city mobility was much better than my country mobility. Yes, I still knew my way around the farm, but I just wasn’t as comfortable in my movements. We did have a deck of cards that was large print. They had come from my grandma’s so we were still able to play some games.

It was also difficult for me to function in mom’s kitchen. Most of the things were always in the same place, but finding things in the pantry or the fridge were a bit more challenging as she put them where there was room. That meant that things weren’t always in the same place let alone the original container. The fridge was always a bit of a three dimensional jigsaw puzzle. When you opened a container from the fridge, the contents weren’t always what the label said was in it. Mom knew what was in all the containers but she didn’t always take time to re-label them. Another thing that made functioning difficult for me, was that neither the stove or the microwave were marked with labels that I could see or feel. Aside from setting the table and helping with the dishes, there really wasn’t a lot that I could safely do in the kitchen.

It may sound strange, but going to the farm after losing so much of my sight often made me feel like I was 10 years old again. I couldn’t function on my own and I felt like my independence was gone. I suppose I could have had them have things marked for me, but I didn’t feel it was necessary given the limited time I spent there.

Overall though, it just wasn’t the same. Bus fare was also increasing and it was getting harder for me to afford the trip even if mom and dad paid part of it. I started going out less and less. Eventually, I pretty much quit going.

From the late 1990’s on, I’ve only been out a handful of times. The last was for my dad’s funeral. I took the bus that day, but only went to the funeral home and then back to the city.

It wasn’t that I didn’t want to go out. I would have loved to spend more time there. It was more the circumstances and financial limits that held me back. I still saw my parents at least a couple of times a year here in the city. We talked every Sunday on the phone – usually about an hour every week.

I love living in the city. But, I do miss the peace and solitude of the farm. I miss the fresh air, the open spaces and the privacy. There are often times that I close my eyes and drift back in time to the days when life was simpler. I’d mentally take a walk down the lane or along the shady path in the trees. I’ll imagine sitting on the stone steps or laying on the cool grass staring up at the starry night skies or watching a glorious sunset.

You can go home again. You just need a really good imagination to do it.

dn

Sunday, May 1, 2011

Citrus Baked Salmon and Veggies

A few weeks ago, I saw a recipe on the Peak Of The Market site for a “Salmon Veggie Bake” that sounded interesting. Like most recipes I find, there were a few things that I felt needed to be tweaked to suit my tastes. The originally recipe used only carrots, mushrooms and green onion as veggies. A bit boring for my tastes. I wanted a bit more variety of veggies so I added red pepper, broccoli florets and celery to the mix.

I didn’t like the idea that you had to partially pre-cook the carrots before proceeding to assemble the recipe for the oven. An extra step, that I felt could be avoided if you cut the carrots a little smaller. I also wondered if using only orange would make the dish to sweet so I used an orange and a lemon.

Yeah, I know – I pretty much rewrote the recipe! But anyone who knows me, knows that is what I almost always do!

So here is my version (with pics!) of the “Salmon Veggie Bake” which I have renamed for my recipe box:

Citrus Baked Salmon and Veggies

1 orange
1 lemon
2/3 cups carrots, cut in match stick style
1 cup sliced fresh mushrooms
1 1/4 cups broccoli florets
1/2 cup green onion (cut in 1/2 inch pieces)
1/3 cup sweet red bell pepper, cut in matchstick style
1/4 cup thinly sliced celery
1 teaspoon crushed garlic (bottled type)
1 teaspoon basil
1/4 teaspoon thyme
1/4 teaspoon parsley flakes
2 boneless, skinless salmon fillets (about 4 oz. each)
2 teaspoons Olive oil
Salt and fresh ground black pepper to taste

Grate the peel of the orange and the lemon and place the peel in a medium bowl. Slice the orange and lemon into 8 slices each. Remove seeds. Set slices aside. Add the garlic, basil, thyme and parsley to the grated peel. Prepare the veggies and add to the peel mixture. Toss lightly to combine.

Divide the veggies evenly onto two large pieces of foil that have been lightly sprayed with Pam or other non-stick cooking spray. Lay one salmon fillet on top of each of the veggie mixes. Drizzle each fillet with 1 teaspoon of the olive oil. Sprinkle with salt and pepper.

Lay out half of the orange and half of the lemon slices on top of each of the salmon and veggie mixes. Lightly spray with a bit more of the Pam.

Pull the foil up over the mix and seal edges and top with a double fold. Place on foil lined baking sheet and bake in 350F oven for 30 minutes or until veggies are cooked and the salmon flakes easily.

BE CAREFUL when opening the package as it is VERY hot and the steam can easily burn you!! Serve with brown rice or a pasta such as lemon pepper linguini.

Serves 2.
Notes:
- The carrots and red pepper will cook in a similar time as the other veggies IF they are sliced in small sticks. Cut them any larger, and they will need to be partially precooked so that all veggies are done at the same time.
- I started to boil water for the pasta five minutes after I put the salmon and veggies in the oven. That way they were both done around the same time. You could also start a casserole dish of brown rice in the oven while you are preparing the packets.
- When serving, I squeezed the flesh and juice of the cooked fruit over the salmon and veggies as it added to the overall flavour. You could just lay the pieces on the side of the plate and let each person squeeze their own if they want it.
- For a more tangy flavour, you could use two lemons rather than the orange and lemon. You could also have a slightly sweeter flavour by using only two oranges. The choice is yours!

Enjoy!

dn

Sunday, April 24, 2011

Easter Humour

Today, is Easter Sunday so I thought I would offer you some humour to enjoy with your chocolate!

There's nothing better than a good friend, except a good friend with CHOCOLATE.
- Linda Grayson, "The Pickwick Papers"

Good Idea: Finding Easter eggs on Easter.
Bad Idea: Finding Easter eggs on Christmas.

I'm a little hoarse tonight. I've been living in Chicago for the past two months, and you know how it is, yelling for help on the way home every night. Things are so tough in Chicago that at Easter time, for bunnies the little kids use porcupines.
- Fred Allen

A strangely reflective, even melancholy day. Is that because, unlike our cousins in the northern hemisphere, Easter is not associated with the energy and vitality of spring but with the more subdued spirit of autumn.
- Hugh Mackay

Alzheimer’s Advantage You can hide your own Easter eggs.

All I really need is love, but a little chocolate now and then doesn't hurt!
- Lucy Van Pelt, "Peanuts

A lady opened her refrigerator and saw a rabbit sitting on one of the shelves.

"What are you doing in there?" She asked. The rabbit replied: "This is a Westinghouse, isn't it?", To which the lady replied "Yes."
"Well," the rabbit said, "I'm westing."

Q: Why does the Easter bunny have a shiny nose?
A: His powder puff is on the wrong end.
Q: What is the difference between a crazy bunny and a counterfeit banknote?
A; One is bad money and the other is a mad bunny!
Q: Why is a bunny the luckiest animal in the world?
A: It has four rabbits' feet
Q: What do you get when you cross a bunny with an onion?
A: A bunion
Q: What kinds of books do bunnies like?
A: Ones with hoppy endings!
Q: What did the rabbits do after their wedding?
A: Went on their bunnymoon!
Q: Why did the Easter Bunny have to fire the duck?
A: Because he kept quacking all the eggs!
Q: How does the Easter Bunny paint all of those eggs?
A: He hires Santa's elves during the off-season.
Q: What happened when the Easter Bunny met the rabbit of his dreams?
A: They lived hoppily ever after!

dn

Sunday, April 17, 2011

The Wedding

Unless you have been living under a rock for the last several months, you may have heard that there is a wedding coming up on Friday, April 29 in London. Yup, Wills and Kate ... oops, make that Prince William and Miss Catherine Middleton (soon to be Princess Catherine will tie the knot at 11:00 AM London time.

The couple have been dating off but mostly on for several years and last fall he finally proposed to her. The wedding details have slowly been trickling out ever since. Some are based on speculation and other tidbits have been released by the palace.

One thing I have to give them credit for is to start a charitable gift registry. They have selected a number of charities that have a special meaning to them and asked people to donate to those rather than to give them a gift. Wise choice. After all, how many crock pots and blenders can one couple use? Especially a couple with the deep pockets such as theirs.

I guess I should make a confession here. I have nothing against the Royals, it’s just that I am not a fan of Royalty or the pomp and ceremony that goes with it. My grandmother thought very highly of the Queen and the Royal family and tried to instil that awe and respect in me. To a point it worked – for awhile anyways.

When I was about ten, Princess Anne and some other Royals were in Canada. She visited my home town and I was there in the crowd. I don’t remember much of it but I do recall she wore a light blue dress and I was within arm’s reach of her. Big deal right? No, I didn’t really see what all the fuss was about. Years later, my mom and I were having lunch at a restaurant here in the city and everyone kept watching out the window. We asked what was going on and were told that the Queens motorcade would be passing shortly. Someone finally said it was coming, so everyone in the restaurant (including us) ran out onto the boulevard to wave at the Queen. Whoopee! A fleeting glance of an old woman wearing a hat as she is driven by in a big black car. Everyone was thrilled. I just wanted to go finish lunch.

In most respects, I’ve never really understood the whole Royal thing. I know that Royalty has had their importance in the past but the whole concept of Royalty, pomp and privilege due to birth or through marriage just seems so outdated and wrong. There is so much more that could be done with the money spent on or by them. Sure they do charity work and make money for charities by appearing or lending their name but it all seems so fake and so removed from the realities of the average person.

There are so many rules and regulations they have to live by. Some call it privilege but in many ways it is an oppression as their life is not really their own. You almost never see the women wearing the same outfit twice yet countless people around the world are homeless, hungry and in dire need of even a tiny fraction of what is handed to the Royals on a proverbial silver platter because of the family they were born or married into.

In the days when my grandmother was such a fan, the goings on behind the palace walls were well guarded. The biggest scandal to reach the outside was the abdication of King Edward so that he could marry the love of his life – a divorcee named Wallace Simpson who ... gasp ... was a commoner and also an American!

Times have changed a lot in the almost thirty years since my grandmother passed. She saw the wedding of Prince Charles and Diana Spencer but not much more. Royal scandals have become a regular event.

What she didn’t see, was how the Royal family pretty much closed their collective eyes to the myriad of cheating spouses and the ever increasing scrutiny of the press and paparazzi. She didn’t see how Diana was thrown to the wolves as it were for being human. Diana was in way over head even before the wedding but tried her darnedest to live up to the Royal expectations.

Diana was the one who finally put a human face to the proverbial “stiff upper lip” of the Royals. She was one of the first celebrities to reach out to those with AIDS. She tried to teach her boys that there is more to life than being a Royal.

In many ways, she seems to have succeeded in that respect. William and Harry have both stepped out in their own way from behind the sheltered life of the Palace. From what I have seen and read, they seem to be far more aware of what is really going on outside in the real world. Their mother would be proud. Too bad the Windsor’s hadn’t shown her the same respect and acceptance before, during and after her marriage to Charles. Even in her death, her humanity and her spirit were all but ignored by the Royals. Okay, they did eventually make a few statements but it was too little too late for most of the fans to truly accept the sincerity of it.

Now, it is many years later. A few more scandals, divorces and such have passed. The Queen mum has died. Andrew and Sarah have divorced. Charles finally married his real love Camilla (she wasn’t deemed worthy to be his wife all those years ago before Diana). Another Royal wedding is about to take place. Prince William is second in line to the throne after his father Prince Charles.

William has been doing his best to prepare and yet also protect his lady love and her family from the prying eyes of the often vulturous media. Over the last few weeks, they have made several public appearances to ... ahem ... feed the media beast. In the hope that this will quell their hunger to devour her as they did his beloved mother. Only time will tell if the plan works.

Alas, the hype in the lead up to the big day has only increased. England has declared the wedding day as a holiday in the hope that the people will come out in throngs to celebrate. Tens of thousands of Royal watchers from Great Britain and around the world are expected to descend on the city to watch the processions for even a glimpse of the bride and/or groom. The souvenir market is overflowing with tacky kitsch ... both Palace endorsed and the fake. Media outlets around the world are planning and promoting extensive coverage.

Here in North America, the major networks are starting coverage early – REAL early! There is a six hour time difference between London and here in Winnipeg. Our networks are starting the coverage at 2:00AM central. They will cover the arrival of the commoners, the dignitaries and the celebrities. The wedding itself and of course any other mundane or minute detail they unearth.

Needless to say, there will be those who get up or stay up all night just to say they saw it live. Many will PVR/DVR/TIVO the whole thing to watch at a more reasonable hour. Most will likely watch the (no doubt) endless ad nauseam rehash of coverage online or on TV later in the day.

As for me, the only reason I’ll be up that early is to answer a call from Mother Nature! Otherwise, I’ll be in dreamland catching some zzz’s! There will be ample coverage later that I can ignore.

It won’t be easy, but they seem to have it far more together than other Royals and newly Royal who have gone down this path. I really do wish the happy couple well. I think they are going to need all the luck they can get.

dn

Sunday, April 10, 2011

dn's Lemon Chocolate Chip Muffins

There is something about the smell and taste of a lemon that makes me think of spring! The scent alone just seems to freshen up a room and awaken the senses. The taste of lemon cleanses the palate and leaves me wanting more!

Lemon and chocolate aren’t a combination that most people would necessarily think of. However, when you do stop and think about it, the tartness of the lemon and the rich sweetness of even a dark chocolate are a marriage made in food heaven! I’ve loved this combo for many years and have tried it in desserts such as my "Lemon Cloud Pie" and "Jollygood Squares"! I also have a lemon chocolate chip cookie recipe that I will have to post sometime. So why not try lemon as a main flavour in a muffin?

A couple of years ago, I stumbled across a recipe on the Taste Of Home site for Lemon Chip Muffins that sounded good, so decided to give it a try.

The original recipe called for buttermilk or yogurt. I never buy buttermilk and I don’t eat yogurt so I used the extra lemon juice from the lemons to make my own buttermilk. Granted, my version of the buttermilk for this recipe uses more than the average buttermilk substitute*, but the extra lemon only adds to the flavour!

Of course, I did a bit more than that to put my own spin on the recipe! I added both whole wheat and all purpose flour. Needless to say, I also added more chocolate chips!

The result was a flavourful blend of the tart lemon and the sweetness of the dark chocolate! These are great as a breakfast muffin or to enjoy with a bowl of fresh fruit or a cup of your favourite break time beverage. These freeze well - even with the topping on them. Just thaw them first and then stick them in the microwave for about 10 seconds before serving to bring out the blend of flavours!

dn's Lemon Chocolate Chip Muffins
3/4 cup butter or margarine, softened
1 1/2 cup plus 3 tablespoons sugar, divided
3 eggs
2 cups whole wheat flour
1 cup all-purpose flour
1 1/2 teaspoons baking soda
1/4 teaspoon salt
1 1/2 cup miniature dark or semisweet chocolate chips
2 medium lemons
Approx. 1 1/4 cups milk

Directions:
Wash and dry the lemons. Grate the peel of the two lemons and set the peel aside. Juice the lemons, removing any seeds. Measure out 3 Tablespoons of the lemon juice and set aside. Place the remaining lemon juice in a two cup measuring cup. Add enough milk to make 1 1/2 cups. Stir to combine, then let stand for about 5-10 minutes while you prepare the rest of the ingredients.

In a bowl, cream butter and 1 1/2 cup sugar. Add eggs, one at a time, beating well after each addition. Combine flours, baking soda and salt; add to the creamed mixture alternately with buttermilk. Fold in chocolate chips and lemon peel. Fill paper-lined muffin cups two-thirds full.

Bake at 375° for 18-20 minutes or until a toothpick comes out clean. Do not over bake. Brush tops with lemon juice; sprinkle with remaining sugar. Cool for 5 minutes before removing from pans to wire racks to finish cooling. Yield: 2 to 2 1/2 dozen.

Enjoy!

*Buttermilk is easily made by placing either 1 Tablespoon of fresh lemon juice, apple cider vinegar or white vinegar in a 1 cup measure then adding enough milk, soy milk or cream to make 1 cup. Stir to combine and let stand for 5-10 minutes before using in any recipe. This method works particularly well for most baking recipes which call for buttermilk or yogurt.

dn

Sunday, April 3, 2011

Assembly Required

Whatever happened to the days when things came pretty much assembled?

I’m not talking about kids toys that parents spend all Christmas Eve assembling. Those have been around for what seems like eons! I’m talking about the everyday items that are used to furnish a home. You know, the kind where all you would have to do is open the box and attach a handle on a dresser or a set of legs for a table, couch or chair.

Back in the real old days – before I was born – you either made your own furniture or you bought it preassembled. A delivery truck would show up at your door and bring in the finished piece and even position it for you.

Even when I was younger, the delivery guys would sometimes help you take things out of the boxes for you if you asked nicely and gave them a small tip.

I remember ordering a pair of tall bookcases for my apartment back in the early 1980’s. The delivery guys brought them in and positioned them where I wanted them. All I had to do was place the adjustable shelves at the levels I wanted. I also ordered dressers that were completely assembled – even the handles were on!

Then, sadly, things started to change. Manufacturers realized that they could save money by leaving some of the assembly to the customer. That way their packaging and labour costs would be less. Shipping would also be less expensive. They assumed that most customers would embrace a slight inconvenience (read: do it yourself work) to save a little money.

They, of course were right. Who doesn’t love saving money? Most customers didn’t mind a little work and earning the right to say “I put it together myself!” Even with that bit of extra work, the directions were usually pretty good and gave even a novice a half way fighting chance of getting it done right! Of course they always left out the part about having a couple of screws left over!

Alas, time has moved on and the “Assembly Required” seems to be about the only way to buy any furniture these days. About 13 years ago, I bought a bookcase headboard that took two of us 5 hours to put together.

About 9 years ago, I bought a TV stand that took me about 5 hours to put together by myself! Okay, it took me longer because I am legally blind. Maybe the “average” person could have done it faster, but I did it and I was proud of it!

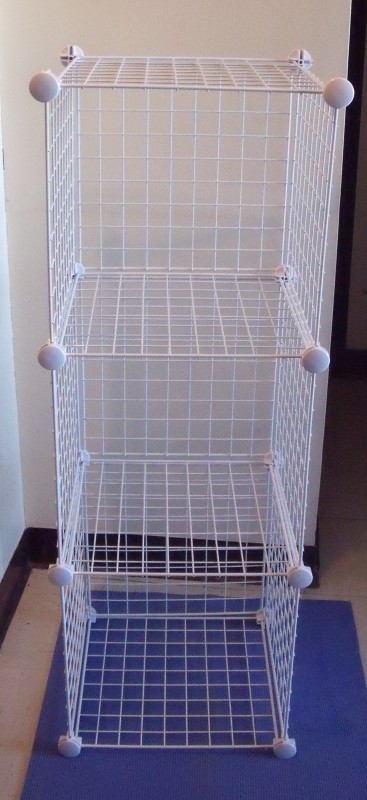
So a few weeks ago, I went shopping for a small mobile cabinet that I could use for storage and to set a lamp on beside my chair. I found one on sale for 25% off at a local Office Depot. Including taxes it would be just under $110.00. Sounded great – until I asked about assembly. Well, they could arrange for someone to come to my home and assemble it for me but it would cost $60.00!! WHAT? Seriously? I don’t think so!

I figured that I had done enough assembly before – I could do it again! Granted, I didn’t have quite as much sight or the same finger dexterity that I had even 7 or 8 years ago but how hard could it be? Well, sadly, it could be very hard. The actual pieces of the cabinet were well defined, but the hardware was packaged into a few small bags and not even labelled. There were 91 screws in five different sizes. The parts list didn’t show life size pics of the screws so you either guessed or measured to make sure you had the right ones. Not only has the complexity of DIY construction increased tenfold, the instructions have also changed. To assemble anything these days, you either need an engineering degree or at least have a sense of how to read a blue print!

The instructions were basically a series of sketches with lots of numbers and letters on them. I assume that the lack of writing was also to save paper that would be needed to print out more details in several languages. That didn’t bother me though, as I assumed that I could get more details at the web address provided. No such luck. I couldn’t even find the model number or even the cabinet on their website. Their so called “help” videos were flash animation of how to install parts that I already knew how to do. After finally sorting out all the parts and getting the pieces organized, I started on step 1. Part of that required 9 of the tiny 16mm screws.

It did not go well. Granted I had injured my shoulder the week before, but my fingers could not hold those little screws to get them started properly. It took me a long time to get six of them in. Then I realized that the last three for that step would have to be inserted in a recessed area. I tried a few times, but quickly realized that this was beyond my abilities. I wasn’t impressed nor did I want to have to ask for help. I’m stubborn that way. But I knew I was in over my head with this project. I certainly wasn’t about to call Office Depot and arrange to pay $60 for some guy to do it for me!

No way! I called one of my friends who came over a few days later. I sorted the parts and got them ready for each step while she did the assembly!! I held pieces in place as needed. We chatted as we got it done. Not including stopping for a lunch of my fresh homemade buns with a topping of salmon, it took us about two hours or so to put it together. The cabinet looks great! Besides lunch, I paid her in some more buns to take home, a bag of homemade Black Forest Cookies and a few hugs! She was glad to help – even if her arm was a bit sore from all that screwing!

dn

Sunday, March 27, 2011

Finding A New TV

As I related in my last post, I’ve always had TV’s in my life. From watching my parents TV to getting my own 13” Black and White when I was about 13 to purchasing new and better models as needed. Now, in 2011, it was time to get yet another new TV. I had known for awhile that the time to replace it was coming so I had been doing a bit of research and trying to keep up with all the changes in TV’s over the last few years. I pulled out my Consumer Report’s magazines to read up on current TV’s. I read customer reviews online for a variety of brands, models and sizes. I asked friends and family what brand and size screen they had and if they liked it. I went to several stores and looked at the various models. There was so much choice out there! Narrowing it down wasn’t going to be easy. Originally, I was going to get another 32” – I had pretty much decided on a Samsung actually. But as I was researching and talking to various people, I learned that a 32” flat screen was basically equivalent to the old 27” – at least for shows that were not in HD. Since not all programming is in HD at this time and I often watch classic TV shows and old movies, that meant that a fair bit of what I watched would likely be in that smaller screen. I could stretch it out but that doesn’t always work without some distortion. Well, I certainly didn’t want to end up going down in size, so started looking at larger screens. The additional cost was a factor but the main problem for me, was that I only had a limited amount of space. As much as I would have loved to get a really big screen, I just didn’t have enough room – even if I mounted it. The only place I could put the TV was in the same area as my old one had sat - near a doorway. Since the new TV’s are so much lighter in weight, I was concerned about knocking it over as I came around the corner. I had bumped the old one several times over the years! If I mounted it, it would have to go above where the old TV sat. The wall space was also limited as the thermostat was to the left and the PC desk/hutch was to the right. I checked the external measurements of different sized TV’s. I didn’t bother with the depth as they would all come out 8-10” after mounting. Using newspaper and tape I made mock-ups of the surface area I would need for each of the sizes. A 42” was too big for my space. After some debate, I decided that I could go as big as a 40” if I mounted it. I finally settled on a 37” as that was a more comfortable fit for the wall and my wallet! As luck would have it, just as I made that decision, I got a flyer from a local electronics store with a 37” Toshiba on sale for $449! I did some checking online and learned that the suggested retail price was $750 but the set was most likely on clearance. I also learned that 37” sets are gradually being phased out and that the size below will be 32” and the one above would be a 40”. I knew I couldn’t afford a 40” but this 37” got great reviews on all the sites I checked so I decided this was the best fit for me. One morning in late January, one of my gal pals met me at the electronics store to pick up the TV, a new surge protector and the wall mount kit. I wasn’t sure when I would get it wall mounted, so we set it up on the base that came with it and set it on the floor in front of an old stand that I still had from my 20” set. Getting it mounted was going to be a bit harder, as the walls in my apartment are either cinderblock behind drywall or steel beams behind the drywall. A regular drill was not going to work. I had researched the wall mount kits almost as carefully as I had the TV, so knew that the one I had picked - Rocketfish 26" - 40" Full Motion Flat-Panel TV Wall Mount (RF-TVMFM02) would be good for various sized screens but also included the hardware to mount on the walls I had. The tricky part would be finding someone with the right kind of drill who was willing to do the mount. Luckily the caretaker had such a drill and was willing to do it when he had some extra time.I had to wait about 10 days but he did a great job with the mount! I had him hang it a little higher than most people probably would have, but this way it is easily viewed from all points in the room. It has only been two months since the purchase, but so far I am really enjoying the new TV. As you can see from the pic, I still haven’t gotten around to tying the cords properly. I also haven’t decided whether or not to replace this old stand with something a little newer. But for now, it all serves the purpose. Now, if you will please excuse me, I have some TV to watch.... dn

Sunday, March 20, 2011

The TV’s In My Life

My parents got their first TV a year or so before I was born. When I was a kid, I used to sit on a hassock in front of it and watch the cartoons on Saturday mornings. If she had time, my mom would watch a couple of soap operas or game shows in the daytime while she was sewing or doing other stuff near the set. Dad would watch the sports on the weekends if he wasn’t working in the fields or doing other farm work. I don’t recall a lot of arguments over what we would watch in the evenings – after all we only had three stations to choose from! We didn’t get our first colour TV until the early 1970’s. I was in junior high and my mom was working at the school. Dad and my brother had been shopping that day and wanted to surprise us, but when we came home that evening we noticed part of a large folded box sticking out of the rafters in the garage as we drove in! The men thought they had it up all the way, but it had slipped a bit after they’d gone back in the house. I think they were a little disappointed that they didn’t get to surprise us when we walked in but it was the thought that counted! I got my very own TV when I was about 13. My dad had won $3,000.00 in a local area lottery and gave each of us four kids a couple hundred to do with as we pleased. I spent part of my share on a 13” black and white portable TV for my bedroom. I didn’t abuse the privilege of having my own set, but I sure loved being able to watch the stuff I wanted to watch! That set lasted me for several years. I eventually replaced it with a slightly bigger 15” model which I kept till the late 1980’s. In 1987, I finally bought my first colour TV – a 20” RCA. If I recall correctly, it cost me almost $500! That was a lot of money at the time and I debated about spending that much, but was really tired of watching everything in black and white! I had a bit of trouble with the picture tube in the first few months but it was repaired under warranty and actually lasted till the summer of 2002, when it died. TV’s had changed a lot in those preceding years. My eyes had also changed and I wanted a bigger screen to see things a bit clearer. Since, the 20” died rather quickly, I didn’t have as much time to research a new one this time. As a result, I only looked in a handful of stores over a couple of days before deciding on a 32” Sanyo. It had a great picture and the sound quality was also very good. The downside, was that the thing was big and very heavy. It also cost close to a $1,000.00! Ouch! That was a LOT to spend for a TV. Add on to that, the fact that I would also need a new stand to put it on and this was a major investment for me! The stand I picked out weighed almost as much as the TV and was a pain to put together – in no small part because it was a blistering hot August day and I had no air conditioning! It took me several hours, but I did it on my own and had it ready when the TV was delivered a few hours later. Despite the weight, the Sanyo was a good TV and I was pleased with the quality and performance – until last summer. Every once in a while, the picture would go a little jaundiced. It would correct itself fairly quickly but it was still a bit annoying. Gradually, it started doing it more often. Once every couple of weeks, eventually became once a day and then it started doing it several times a day. As time wore on, the picture wouldn’t correct as quickly or as well. The jaundiced would switch to a flickering blur of blue as it tried to correct then go to black screen for a few seconds before the picture would come back. The sound was never affected through any of this though. At first, this routine would result in a fully corrected pic, but over time the effort to recover, became harder and it often took two or three attempts over a few minutes to get decent colour again. Sometimes, I even had to turn the TV off for a few seconds before I could get it to work properly. It was definitely time to start looking for a new TV! dn Next: Finding a new TV.

Sunday, March 13, 2011

dn's Peanut-Crusted Pork Tenderloin

I came across the original recipe for this entre on page 19 of the Spring 2010 issue of the Compliments.ca magazine called “Inspiration”. It sounded quite tasty but called for an ingredient that I didn’t have - Sensations by Compliments Lime & Chilli Kettle Cooked Peanuts. I guess I could have bought a package of these specialty peanuts, but I really didn’t think I’d use them for anything else and the taste combo might be too spicy for my liking to eat them on their own. I didn’t want to spend the extra money for a premium product either. So, like pretty much every other recipe I’ve ever tried, I decided that I could do a little improvised adjustments and create a similar version with everyday ingredients!

Here is what I did differently: The peanuts were seasoned with lime and chilli so I added some lime juice and some red pepper flakes to replace those flavours. I also added a bit of garlic for extra kick and well, just because I love garlic! I used regular salted peanuts for the crust. The result was a very flavourful dish that I have made several times since.

dn's Peanut-Crusted Pork Tenderloin
2 teaspoons Dijon mustard
1/2 cup crunchy peanut butter
2 teaspoons lime juice
1/2 teaspoon crushed garlic (bottled type from produce section)
1/2 teaspoon red pepper flakes
1 pound pork tenderloin
1/2 teaspoon salt
1/4 teaspoon pepper
2 teaspoons canola oil
1/2 cup crushed Peanuts
Finely sliced green onions for garnish

Preheat oven to 350°F (190°C). Mix mustard, peanut butter, lime juice, red pepper flakes and garlic in a small dish and set aside. Season pork tenderloin with salt and pepper. Heat canola oil in a large skillet on medium-high heat and sear pork on all sides until browned.

Spread peanut butter mixture evenly over pork and roll tenderloin in peanuts. Place on parchment paper lined baking sheet and roast for 15 to 20 min., until golden and temperature reaches 160°F (71°C)) on a meat thermometer.

Let pork rest 5 minutes, slice, garnish with green onions and serve with brown rice and a green veggie such as broccoli or green beans.

Yields: 4 servings

Notes:
- I had some leftovers so the next day, I scraped off the coating and set it aside. I sliced the meat very thinly. Then I took a soft whole wheat tortilla and spread it with a bit of mayo, added the meat, coating mix, some shredded lettuce and a bit more chopped green onion. SO GOOD!!
- I have also tried this recipe using thick, boneless pork chops. Sear the chops as you would the tenderloin and proceed the same with the rest of the recipe.

Enjoy!

dn

Sunday, March 6, 2011

Dad and Charlie

In a recent edition of Assignment America on the CBS Evening News, Steve Hartman told the heart-warming tale of Dominic and Maria...


This story brought back a lot of memories for me. Memories of growing up on the farm and of a certain gander...

Just over 40 years ago, my maternal grandfather was writing the family history and decided to tell the story about my dad and a certain gander we once had on the farm. I really like the way my grandpa wrote this story, so I’m going to share his words with you before I add my own recollections. With the exception of removing our family surname and referring to my father by his initial only, the story is exactly as my grandfather wrote it:

“An amazing and touching episode which occurred on the family farm in 1969 probably should be included in the epistle. The family is very fond of fowl and in order to have a well stocked freezer, they grow their own chickens, ducks and geese. In the spring, they had a gander and a goose. Somehow the goose got mixed up with the pigs and got killed. Naturally, the gander was exceedingly perturbed. When L buried the goose, the gander seemed to blame L for the mishap. L caught the gander, stroked his (the ganders) head and talked soothingly at some considerable length until the gander seemed to be mollified. From then on the gander, which they called Charlie, followed L wherever he could. Charlie demonstrated at every opportunity that L was his one and only friend in the cruel world. Often Charlie would honk outside the bedroom window. If Charlie was not near the house when L went outside and called, Charlie came with a wide open throttle. Charlie appeared to feel that everyone except L was the enemy and would attempt to chase them away.

One day when they were sitting outside, Charlie kept bringing grass etc. and laying it at L’s feet. Eventually, the obvious became apparent - Charlie wanted L to build a nest. L consolingly explained to Charlie that at this time of the year he just couldn’t take time to set on a nest.

Every effort was made to locate a mate for Charlie. Eventually the only one available was obtained. She certainly was not a luscious of goose pulchritrude. Charlie would have nothing to do with her at first. She was named Cleo, probably short for Cleopatra. After a few weeks, Charlie seemed to overcome his antipathy towards Cleo and apparently concluded that she was better than no mate at all.

Cleo built a nest across the creek and in due course nine goslings were hatched. One did not survive. If you are still with us, we will leave you to imagine Charlie’s pride and joy in his family. He became the ideal father. He remembers L as his only friend in time of dire need.”

Now for my recollections. Let me begin by saying that I’ve never been fond of geese. They are actually a very majestic bird in flight and the feathers of the northern varieties. make an excellent down duvet! I don’t mind seeing them flying overhead, but their honking can be very loud and annoying. Even the taste of goose meat is not appealing to me. I prefer chicken. But most of all, I disliked the birds being a part of our farm.

Charlie and dad really did have a unique bond. When Charlie would honk under the bedroom window, dad would either go to the window or yell from the bed for him to go back to sleep or tell Charlie that he would see him later. Sometimes hearing dad’s voice was enough to calm his ruffled feathers and other times he wouldn’t settle down till dad went outside and spent some time with him.

We had a small motor boat that we would use on the creek from time to time or to get around the farm during flooding. Charlie would swim alongside the boat honking at dad the whole time. Being a domestic goose, Charlie wasn’t able to fly but he did get a bit of air when he got enough speed while chasing various vehicles. That could be a bit unnerving to drivers or to anyone sitting next to open windows! Some of our family and friends claimed that we really didn’t need a dog since we had Charlie as he wouldn’t let anybody except dad out of a vehicle without alerting anyone within earshot of his loud honking.

As grandpa noted, Charlie was very protective of dad. In his mind, dad was his only friend and no one got near him if he had any say in the matter. That included mom and I. If dad wasn’t around when I was getting on or off the school bus, then mom would walk out the lane with me or meet me as I got off the bus in the afternoon. She was armed with a broom stick to scare off the gander guard.

Oh, how I hated that gander! He could be downright vicious! Charlie would try and nip at our legs or heels as we walked. If he saw us outside he’d start running towards us. If he got enough speed up he would become airborne for at least a few feet. He’d chase me when I rode my bike if dad wasn’t around. Trust me, having a honking, angry, wing flapping gander coming straight at you was not a pleasant experience!

For Charlie, I think it was partly a game and partly protecting his territory. Even if dad was around, he would still use that snarling hiss of his or honk loudly at anyone who was nearby. If we were entertaining anyone outside for any length of time, dad would put Charlie in the barn or one of the sheds. Charlie voiced his protest but at least he wasn’t chasing us or our company.

Charlie did calm down a bit once he and Cleo finally got together but he still didn’t really like anyone else being around either him or dad. Cleo didn’t take to kindly to most of us either. The goslings were quite cute – until they grew up. Granted they all made a handsome family – at a distance!

As with all farm livestock, Charlie, Cleo and family were eventually ... hmm ... how shall I put this ... “Dressed for the freezer”! Dad was a bit sad to see them go, but being a lifelong farmer, he knew the inevitable must happen at some point. The rest of us, were just glad that it was once again safe to go outside without a broomstick in hand.

Over the winter, whenever goose was on the menu, we would wonder out loud if this was Charlie. Of course, we never knew for sure, but there was that one bird that was particularly tough......

dn