Sunday, January 20, 2013

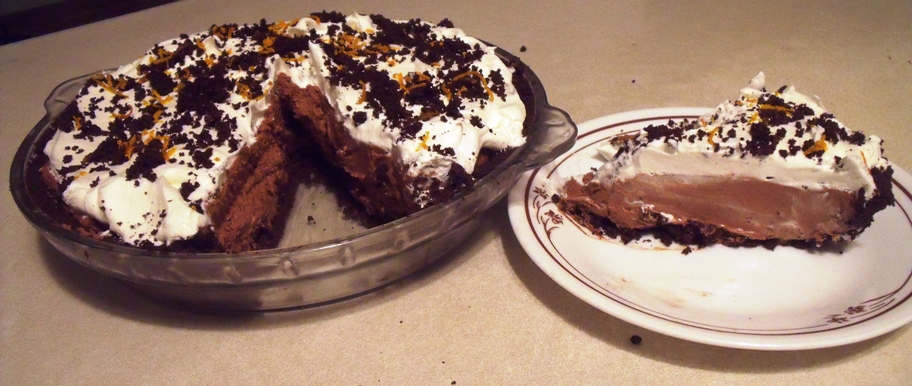
Orange and Chocolate Cream Pie

Over the years, I've made it a tradition to come up with a new dessert to serve for my annual get together with the girls. This past holiday season was no exception!

Of course, it contains chocolate - both in the cookie crust and the filling. The bittersweet chocolate in the filling is also enhanced with the juice and zest of an orange and I added some Grand Marnier liqueur! I used light cream cheese and light whipped topping, but didn't add any sugar. Sugar would only distract from the sensational flavour combination of the chocolate and orange!

The result, is a decadent looking dessert that is a much lighter texture and less caloric version of a chocolate cheesecake. Despite all the chocolate and orange flavour it isn't overly rich or sweet either!

I've made this dessert a couple of times over the last few months and everyone who has tried it has thought it was delicious! 

The dessert I came up with isn't just for holidays or special occasions though. It is simple enough to make and enjoy at any time of the year!

That being said, with Valentine's Day just a few short weeks away, and the abundance of fresh oranges in stores right now, this pie would be a perfect way to finish off a meal! 

Orange and Chocolate Cream Pie
22 Fudgee-O* cookies (1/2 of 550g bag)
3 Tablespoons margarine, melted
8 ounce/250g light cream cheese, softened to room temperature
6 ounces bittersweet chocolate
1 orange
2 Tablespoons Grand Marnier**
1 Litre container light whipped topping

Break cookies into smaller pieces and place in food processor. Pulse to form crumbs. Add melted margarine and pulse to blend. Reserve 2 Tablespoons of the crumb mixture for topping. Place the remaining crumb mixture into a very lightly greased 9 or 10 inch deep pie dish. Gently press onto bottom and up the sides to form an even crust - about 1/8 inch thick. Chill in refrigerator for at least one hour.

Chop the bittersweet chocolate into small pieces and place in a microwave safe bowl. Melt on medium power, stirring every minute until thoroughly melted - about 2 - 2 1/2 minutes. Set aside to cool.

Zest the orange as thoroughly as possible without going into the really white pith. You should get about 2 Tablespoons from a good size orange. Set the orange zest aside and juice the orange. You will need a minimum of1/3 cup but can use up to1/2 cup of juice. (If you have more than that, either drink it or reserve for another use.)

Cream the softened cheese to make it really light and smooth. Add the cooled, melted chocolate and blend thoroughly. Add the orange juice, Grand Marnier and about 2/3 of the zest. Mix till well blended. Stir in about 2/3 of the 1 litre container of whipped topping. Combine till smooth and creamy.

Pour the chocolate cream cheese filling into the chilled chocolate crust and spread evenly to edge of crust. Top with the remaining 1/3 of the whipped topping.

Garnish with the reserved cookie crumbs and orange zest.

Chill at least 3 hours or overnight before serving. Makes 6-8 servings.

* Fudgee-O's are pretty much the same as a Oreo with the major exception of a chocolate filling rather than a white cream. I have also found that the No Name version of this cookie sold by Canadian Superstore is a suitable substitute in flavour and texture - and a lot cheaper!
** This isn't a lot of liqueur, but if you prefer not to use it, then you can omit and just add the equivalent in orange juice. If you don't have Grand Marnier, you could also substitute Amaretto or Frangelico.


Enjoy!

dn

Sunday, January 6, 2013

A New Year, A New Adventure!


Happy New Year!

We are just a few days into a brand new year. For most, the often hectic pace of the holiday season has pretty much settled back into normal routine. The decorations are put away, the turkey and holiday treats are gone from the fridge and the temptation!

Some have made resolutions - and a percentage have already broken them!

I used to make resolutions when I was younger, but I just never seemed to be able to follow through on most of them. The resolutions were made more out of good intentions rather than true desire to make changes.

I don't make resolutions anymore. Not that I am perfect! Not by any means am I perfect, I just choose to live every day as a gift and be the best person I can be.

As I grow older, I find it harder to make changes. I get used to doing things in certain ways. I make minor adjustments when I have to, but even those can sometimes be a challenge.

Yup, I am slowly turning into one of those "set in their ways" folks! Not that I'm really THAT old as I am only 55 - I'm just comfortable in my routine!

However, this year there will be a change!

This year is different. I will have an adventure.

I am about to go on my first ever winter trip!

Aside from a few medical related trips in the 1990's to Toronto and Calgary - for various eye treatments, I've never really had much of an opportunity to travel more than a couple hour's drive from my home. Okay, there were a handful of trips in my late teens and twenties to Alberta, Southern Ontario and Colorado - but those seem like a lifetime ago!

It has been just over 13 years since I've been on a plane and 30 years since I've crossed the border from Canada into the USA.

It's not that I never wanted to travel. There are lots of places that I'd love to visit. Lots of things I'd like to experience and places to explore. I've just never had the extra resources to make any of those journeys.

Now before, you go jumping to conclusions, this probably wouldn't qualify as an adventure to anyone who has done some traveling. I won't be going hang gliding or swimming with sharks or white water rafting! Nope nothing that outrageous. Well, outrageous for me anyways! Besides, I don't want to have to make use of the medical insurance I bought!

Nope, I am just headed south - out of our "Winterpeg" cold and snow for a few days! A few days of snow free, warm temperatures. It will be a shock to my system but I am prepared to make that sacrifice!

How did all this come about?

As a Christmas present, I received a trip to fly down and stay with my amazing, beyond generous, familial snowbirds for a week at their winter home in Arizona!

The idea of the trip first came up last September. To say I was shocked and overwhelmed is a bit of an understatement! It just never occurred to me that I would ever have the resources to take a trip given my limited finances and visual limitations! I didn't want to jinx my good fortune so I didn't tell too many people about it - in case it didn't work out. There was a lot to figure out and organize before any trip could happen.

But, it has all worked out. I applied for, and received my first ever passport. Some of my awesome friends contributed to my "new luggage" fund rather than buying me individual Christmas presents. I looked in quite a few stores and on several web sites to find the right luggage for me - and finally settled on a model by Samsonite from Bentley's online site. It arrived a few days ago.

The flight is booked. I've made a list of things to pack. I've made a list of things I'd like to shop for while I am in the states. I'm slowly crossing things off of the "to do" list before I go.

To be honest, I'm not looking forward to going through security as so much has changed since I last flew. I've been reading the do's and don'ts on the Canadian and US government and travel web sites. I've been talking to my more seasoned traveling friends for tips and advice. Hopefully it will all go well - both going and returning home.

All in all, I think I've pretty much got it all sorted out. I just have to pack and get to the airport.

It has been an adventure just getting to this point, but I know that once I get on that plane, that will be when the real adventure begins!

dn

Sunday, December 23, 2012

Turkey Lurkey

If you’ve ever listened to the Vinyl Cafe on CBC Radio, you’ve no doubt heard the story of how Dave cooked the turkey. One Christmas, his wife Morley had put him in charge of cooking the turkey. Late on Christmas Eve, Dave realized - too late - that had also meant buying the turkey! He found an all night store and purchased the last turkey. He spent the rest of the night defrosting it with an electric blanket and a hair dryer. When he went to cook it, he was unable to get the stove to work as it had been most recently used on automatic timer. Time ticked on and Dave had to resort to drastic measures to get the turkey he named “Butch” ready in time for his families dinner. (You can here the story here or here.)

Well my turkey story isn’t as extreme as Dave’s but it did have its moments!

Believe it or not, at age 53, I'd never actually cooked a whole turkey by myself before. I used to help my mom get the turkey ready but she was always in charge of actually roasting it.

What had I gotten myself into!?!

Years ago, I occasionally cooked a small 2-3 lb chicken and made it into TV dinners to freeze. I quit doing that as I found it was a lot of work dealing with the bones and I really wasn’t that fond of dark meat. I generally bought boneless, skinless chicken breasts. Occasionally I’d bake a couple over a batch of my mom’s stuffing. Simple, ready in about 45 minutes or less and delicious! Once or twice a year I’d buy a turkey breast roast if I found one at a good price.

So, a few days before Thanksgiving 2011, I went looking for a turkey breast roast but couldn’t find any. A boneless, skinless turkey breast was over $7/lb and I refused to pay that much. I had lots of chicken in the freezer but I was hungry for turkey. Safeway had frozen turkey’s on for $.99/lb. The man in the meat department found one in the back for me that was only 3.9kg/8.6lb. I bought it and stuck it in the freezer.

On the Saturday afternoon before our Canadian Thanksgiving, I started posting turkey updates for my friends. One of them suggested using a technique from Martha. Another said they were going to write a sitcom about my adventure. I asked if they’d be consulting Stuart McLean for info on how not to prepare a turkey – at least not the way Dave had. My friend asked if I had a hair dryer...

I informed my friends that I don't own a hair dryer or an electric blanket. My stove does not have an automatic timer setting, I don't drink scotch and I haven't named the turkey "Butch"! Despite being an experienced cook, this was also a Martha free zone! I was aiming for somewhere in the middle.

Late Saturday afternoon, I took the bird out to thaw. I didn’t want to use the sink or even the bathtub to thaw it in as I knew I would need to use both before the bird was ready for the oven. I finally remembered that I had a decent sized canner that it would likely fit in. I had to put it in at an angle but it just fit! I weighted it down with a heavy cutting board so it would be totally submerged in cold water.

Now what was I going to cook it in? The roaster I had wouldn’t hold more than a 3lb. bird. I used to have a shallow rectangular roaster that it would’ve fit nicely except that I’d given it away less than a year ago since I hadn’t used it in over 10 years!  I could have used the base of my oven broiler pan except that I’d also given it away as I never used it either.

I guess I could have gone to a store and bought one of those disposable pans but by then, it was too late Saturday night and I wanted to get it in the oven by 12:30 or so on Sunday so there wouldn’t be time to go when the stores opened at noon. I may have been able to borrow something from a neighbour but the ones I knew who might have something that large would be cooking their own birds.

A friend suggested I take the turkey to a hotel room... I wasn’t that desperate!

What to do? I finally decided to improvise by putting a wide swath of foil in a rectangular pan I had. The foil would hang out about 3 inches on all sides. I’d set the pan on a cookie sheet to catch any drips.

As I crawled into bed Saturday night, I thought I had everything under control. Turkey Lurkey was thawing and I knew what I was roasting it in.

Then it hit me. Did I still have string to tie up the legs? What about metal skewers to pin the wings? Did I still own a baster? Did I even own a platter? Curiosity got the better of me so I got up to check. I had the string and I found a “Chinet” plastized platter in the cupboard. No idea how long that has been there but I could cover it with foil to serve TL on! Oh well - two out of four ain’t bad!
Sunday morning I made my mom’s stuffing recipe. Turkey Lurkey was thawed so I took it out of the bag, removed the innards, washed the bird and dried it out with paper towels. I laid TL in the improvised roasting pan and put as much of the stuffing in as would fit. (I’d bake the leftover in a casserole dish later.) The skin around the bottom cavity wasn’t complete, so I couldn’t pull it all the way over the stuffing. I used the string to tie the legs together but also used several lengths of string to pull the legs and the wings closely into the bird so they wouldn’t burn or dry out. I took another couple of lengths of foil and fashioned a lid over TL.
I had TL in a 325F oven by 12:20PM. Basting TL wasn’t easy. I tilted the pan to one end and used a tablespoon to pour the liquid over the bird. 

Oh, and one other thing – I didn’t have a thermometer either. By the way, you knew I am legally blind didn't you? I have a large number digital one thermometer but the battery was dead and the old style one I found in my utensil drawer was too small for me to see the numbers. I’d have to “wing” it!

TL was done before 4. I baked the rest of the stuffing and also stuck a potato in to bake. Steamed broccoli and a glass of sparkling apple juice rounded out a delicious meal!

I deboned TL and got about 3 1/2 lbs of meat – 2/3 of which was white. I kept some in the fridge for sandwiches and a couple of suppers and froze the rest in individual portions with a bit of gravy added to keep them from drying out.
It was a lot of work but I’d be enjoying TL for several weeks – probably till sometime after Christmas! 

Would I do it again? Maybe – but if I do, I’ll get a better pan, some skewers and a baster!


Funny thing is, I am normally very organized and over prepared for anything I attempt in the kitchen or almost anywhere else for that matter. I couldn’t believe I hadn’t really thought all of this through or missed that many things. I guess I could have gotten upset at all of the obstacles along the way, but I just kept thinking about Dave and his adventures with “Butch”. I decided to laugh at my adventure.

I laughed a lot that weekend. Besides I thought it would eventually make a good story for the blog!

Merry Humbug!

dn

Sunday, December 9, 2012

dn's Chocolate Sin Cake


If you are looking for a decadent dessert to serve this holiday season - or any time of year for that matter - look no further!  Have I got a chocolate dessert for you!!

Just over a year ago, while having dinner out with some gal pals, I had THE most decadently chocolate dessert that I've ever had in my life! It was called Chocolate Sin - a dense, moist dark chocolate cake with a creamy chocolate filling and a bittersweet chocolate ganache! It truly was to die for!

I decided to attempt to create my own version of this amazing dessert. I looked for recipes online but what I found was far more complicated and fussy than I was willing to attempt - even for that intense chocolate fix! I wanted something that was fairly simple to do - that didn't require major baking skills.

Yup, I wanted a lazy version!

The cake itself was the easiest part. I used my tried and true Better Than Sex Cake recipe. If you have a good dense dark chocolate cake recipe, you could easily substitute it for the cake - assuming you want to make it from scratch! 

The filling and ganache would be trickier. Real ganache is made with high quality chocolate and whipping cream. I refuse to buy whipping cream as it is ridiculously expensive and way too rich for my taste.  I also hate trying to heat it then temper it with the chocolate to make a smooth ganache. It is finicky and prone to disaster if you aren't really careful!

There had to be a simpler way that I could imitate the original without all the fuss and bother!

With a bit of thought, I decided to try doing the filling with a combination of melted bittersweet chocolate and Nutella combined with softened light cream cheese. The first attempt at the filling was a bit on the dry, crumbly side but with a bit of tweaking, I came up with a smooth creamy filling. The ganache to spread over the entire cake would be made with additional melted bittersweet chocolate and Nutella.

I made the cake for a friend's birthday and they raved that it was the best cake ever! I also made the cake for the same gal pals I had dined with and they thought I had indeed captured the flavours and textures of what we had devoured at the restaurant!

This recipe can be made using two 8" or 9" round cake pans. I have also used smaller round pans to make mini cakes - see near the bottom of this post for smaller pan sizes, bake times and altered quantities for filling and ganache. There is also a version for a lemon cake with the chocolate filling and ganache!

A little goes a long way with this cake so the full size will easily serve 12-14.

dn's Chocolate Sin Cake

1 devil's food chocolate layer cake mix
1 instant chocolate pudding mix - 4 serving. Not the low cal variety!
3/4 cup chopped almonds - toasted
1 cup semi sweet or bittersweet chocolate chips
4 eggs
1/2 cup vegetable/canola oil
1 teaspoon vanilla extract
1 cup fat free sour cream

Pre grease two 8 or 9 inch round pans.* Preheat oven to 350F

Combine the cake mix and pudding mix. Remove about 1-2 Tablespoons and mix it with the chocolate chips and almonds. Set aside.

Add the eggs, oil, extract and sour cream to the remaining cake/pudding mixture. Mix on low to combine then increase to medium and beat till light and smooth. Stir in the chocolate chips and almonds.

Divide batter evenly among the pans and bake till toothpick test comes out clean - about 30 - 35 minutes depending on pans and your oven.

Remove to cooling racks and let cool for about 10 minutes. Carefully run a knife around the edge of the pan to loosen any edges from the side. Place a second cooling rack on top of the pan and carefully invert the cake to remove from the baking pan. Allow the cakes to cool completely then chill for a couple hours or overnight.

Filling and coating
2 Tablespoons liqueur such as Cherry Brandy, Kahlua, Frangelico, Amaretto or Grand Marnier 
8 ounces bittersweet chocolate, chopped into small pieces
1 cup Nutella (Hazelnut spread)
1 8 ounce light cream cheese, softened to room temperature
toasted almonds for garnish
With a pastry brush, gently brush the liqueur on the bottom of each layer.

Place strips of wax paper along the outer edges of a cake plate - overlapping so that it forms a full border around the edge of the plate. Lay one of the cakes - top side down in the center of the plate.

Place the chocolate and Nutella in a microwave safe bowl and melt on medium heat - stirring every minute till fully melted and smooth. Set aside to cool slightly.

In a medium sized bowl, beat the softened cream cheese till light and fluffy. Add about 1/2 of the chocolate mixture and mix thoroughly. Carefully spread the chocolate cream cheese mixture evenly onto the bottom layer of the cake. Spread evenly to the edges but do not go over the edge. Align the top layer - top side up.

Carefully drizzle the remaining chocolate/Nutella mixture over the top of the cake - allowing it to drip down the sides. With a knife, carefully spread the melted chocolate to cover all sides. Sprinkle the top with toasted almonds. Chill in fridge for at least 30 minutes. With a sharp knife, carefully cut around the bottom of the cake to separate any dripped chocolate on the waxed paper from the cake itself. Gently slide the wax paper out from under the cake. Return cake to fridge to chill.

Remove cake from fridge about 15-20 minutes before serving to allow chocolate coating to soften slightly before slicing.

Notes:

*If using smaller pans adjust baking times. I generally use 4 smaller pans and find it takes about the same amount of time as an 8" round does. Even though the pans are smaller around, the cake is deeper so the time really isn't that much different. Check them after about 30 minutes.
Make a separate mini cake from each pan. Once the cakes have cooled and chilled slightly, using a sharp knife, carefully slice the cakes horizontally so that you have two layers from each pan. You can also freeze any of the mini cakes BEFORE frosting them. Allow to thaw in the fridge before slicing and frosting.

For the smallest (5"-6") cakes, I use 1/2 the quantity of the filling and coating recipe.
1 Tablespoons liqueur such as Cherry Brandy, Kahlua, Frangelico or Grand Marnier 
4 ounces bittersweet chocolate, chopped into small pieces
1/2 cup Nutella (Hazelnut spread)
4 ounces light cream cheese, softened to room temperature
toasted almonds for garnish

For a 7" pan, I use a 3/4 recipe.
1 1/2 Tablespoons liqueur such as Cherry Brandy, Kahlua, Frangelico or Grand Marnier 
6 ounces bittersweet chocolate, chopped into small pieces
3/4 cup Nutella (Hazelnut spread)
6 ounces light cream cheese, softened to room temperature
toasted almonds for garnish

Flavour variation:
Substitute a Lemon layer cake mix and lemon pudding mix for the chocolate cake and pudding. Make the cake as above. For the liqueur, I use Bacardi Limon but you could use Frangelico or Amaretto. The rest of the recipe and procedures are as above.
Enjoy!

dn

Sunday, November 25, 2012

Shopping For Clothes


I HATE shopping for clothing! Yup, I admit it! I am a female who does not enjoy shopping for clothes!

For many years, I was able to find much of my wardrobe at a Canadian chain called Cotton Ginny. I LOVED that store and spent a great deal of money over the years! Sadly, it closed down a couple of years ago. Many items in my closet bare the Cotton Ginny label. I LIVED in their Organic Cotton jeans! They had just a small amount of Lycra for stretch but - OH they were SO comfortable!

I'd been dreading the day, when I had to shop for new jeans. Those beloved organic jeans have been getting a little thread bare in the last year and wasn't sure they'd make it through another winter. I really should have stocked up before the store closed for good.

Oh well, this past September it was time to face the fact that I needed new jeans. Where to start? Mark's Work Warehouse has a wide selection of garments and I'd found a few tops there over the years, but I'd never gone jean shopping there. Warehouse One was another option. I vaguely recall finding jeans there in the late 80's or early 90's. Oh, for the days of my youth when I could just pick up a pair of Wranglers without having to hit the fitting room!

I'd heard some great things about a store here in Winnipeg on Sargent Avenue called Sargent Blue Jeans. Lots of styles to choose from, knowledgeable staff and free alterations - all at very reasonable, competitive prices. It was a bit out of my way, but if I had to find jeans, I decided to start there.

Sargent Blue Jeans isn't a fancy clothing store. It's focus is on the clothes it carries and the service it provides its customers. As you walk in, the sales counter (large enough to use for a cutting board) is on the right. The fitting rooms are on the left with a commercial sewing machine nearby. Clothing hangs on the walls. In the middle are long rows with a huge assortment of neatly stacked jeans.

The woman at the counter greeted me within seconds of my entering the store. She explained that the owner had stepped out for a few minutes and she was very busy, but would help me when she could. She was in the process of altering a pair of pants, but asked me what I was looking for in a jean. I showed her the CG ones I was wearing and said something like this! CG, had had their own sizing so I had no clue what size to ask for. She looked me up and down and said she would find some to fit me.

A few minutes later, she walked up and down the aisles, stopping occasionally to check through the stacks for a size. She returned with three pairs thrown over her shoulder - showed me into a fitting room and gave me the jeans.

I tried on the first pair and was stunned to realize that they were a perfect fit! I tried on the other pairs. Over the next 15 or 20 minutes, she knocked on the door a couple of times to ask if I needed any help or other sizes. I told her what fit, what didn't and where they didn't fit. She removed the ones that didn't fit and brought more to try on.

This woman was amazing! She just looks at the customer - then walks down the aisles stacked with piles and piles of styles & sizes - picks out a few that she thinks will fit you! She was helping about 3 or 4 of us at the same time AND doing the alterations while we were trying things on! She never once got any of our sizes or style needs mixed up!

By the time I was done, the owner had returned. He was working the cash register, helping customers and ironing newly altered seams.

I tried on eight or nine pairs and purchased two very comfortable pairs of jeans that day - one a dark denim (the first pair I had tried on) and the other a charcoal grey. The total was just under $90 including taxes!

Needless to say, I will be returning to Sargent Blue Jeans for any future jean purchases!

That same day, I was also looking for a wind-breaker. I had been to Mountain Equipment Co-op a week or so earlier but hadn't found anything that I liked that was under $200! YIKES! That was more than I had paid for my winter jacket! Since I was already out, I decided to push my luck and keep shopping!

Wilderness Supply on Ferry Road at Ellice was my next stop. I found a summer weight rain jacket I liked but I wanted to check out Cabela’s while I was out in the area as I REALLY didn’t want to spend $130! The clerk said it was a 14 day return policy or she could also hold it for me for up to a week, but suggested that I should come back on that Saturday as there was going to be a big sale and I could get 60% off! I said that bus service on Saturday wasn’t great so the manager gave her the okay to give me the discount while I was there! With taxes it was $58 and change!!!! Kudos for telling me about an upcoming sale AND giving me the price in advance!!

I was on a roll! I caught a bus back down Ellice to Cabela's. I had to wait a while for a clerk in the women’s wear to be available but it was worth the wait as I found a rain jacket with a light fleece lining that is great for spring/fall and easily layered with my heavy weight hoodie! With taxes – $78 and change!

A VERY successful shopping trip! Three stops, two pairs of jeans, and two jackets for just under $230! If only all my future clothing excursions could be that successful!

A couple of weeks ago, I did return to Cabela's and purchased a pair of water/wind proof pants. I tried on the women's style but they were too short but the men's fit. I'll be layering them over long johns and jeans on the really cold days I venture out this winter.
I don't know how often I'll make it to Cabela's come the new year though as they are moving out near the new IKEA store. At the moment that area has extremely limited and very poor bus service.

I've yet to find suitable locations to buy most long sleeved items or dress pants but I'll keep looking.

With any luck, I'll find more stores that carry items I like before I have to join a nudist colony!

dn

Sunday, November 11, 2012

Remembrance And A Hope For Peace


Today is November 11. In Canada and most Common Wealth countries today is known as Remembrance Day.

At the eleventh hour, on the eleventh day, of the eleventh month, citizens pause to pay tribute to those brave souls of the armed forces who have served and especially to those who died in the service of our country.

I can remember going to services in elementary school. The school would hold a service in the gym on the school day closest to November 11. All students were expected to attend - parents and guests were also invited. There would be bagpipes and some other music, readings, as well as a laying of a wreath. We'd hear veterans from WW1 and WW2 talk about service and freedom. I don't think they told too many war stories, but then again, I was very young.

My maternal grandfather served in WW1. Several uncles served in WW2. To the best of my recollection, I can't recall hearing war stories from them or anyone I knew when I was growing up.

To be honest, I never really understood the meaning of the day when I was a kid. I don't remember being taught a lot about war and its consequences until we reached junior high or even high school. History was never one of my favourite subjects though, so whatever we were taught, pretty much left my memory as soon as the tests for various eras were over.

Even so, the concept of a nation at war and people being drafted into military service or freely signing up to fight anywhere in the world seemed like a very strange concept to a farm kid on the Canadian prairies.

Naive? Yes, I was somewhat sheltered, but that was the early 1960's. The Cold War was looming and the Vietnam War was heating up but both seemed obscure in my world. My parents followed the news and read the papers, but media did not have the ever intrusive roll that it does nowadays. Talk of wars half way around the world or demonstrations against the wars, were not common topic in our area. My parents were more focused on the day to day responsibilities of running a farm. They focused on the weather forecasts as well as the livestock and commodities markets. They focused on raising their children.

My parents did tell us some stories of what it was like for them during the depression of the 1930's and the struggles of rationing during WW2. Given our relative state of abundance, it seemed hard to believe that things had been that difficult only thirty odd years earlier.

As I grew up and was more exposed to the state of the world outside of my prairie home, I saw more reports of world conflicts, civil wars and sadly, even more senseless deaths.

Some want all the toys and all the land and the blind, undying loyalty of the people that they rule.

Some refuse any and all rights to women - including the right to be educated.

Some believe that their religion or language is the only one of value.

Some are all too eager to pick up a weapon and go after their version of justice.

Some choose to believe in the necessity of war - the concept of an eye for an eye and all the destruction that goes with it.

Not me. No matter how hard I tried, I just couldn't seem to wrap my mind around any reasons for people to go to war. Why couldn't they find a way to get along and live in peace?

I was a pacifist long before I even knew that there was a name for what I believed.

Strange as this may sound, I think it was while watching TV shows like "The Walton's" and seeing their day to day trials through the 30's and 40's that made war and hardship more real for me. I've never been comfortable watching war movies or documentaries though as the emotional and physical consequences of war, were just too painful for me to watch. The images would haunt my mind for days and nights after. The only two movies that I can recall managing to watch in their entirety were "Mrs.Miniver" and "Schindler's List".

In more recent years, I've had the opportunity to hear many radio broadcasts from the war years. They often included stories from the home front of how WW2 was affecting their lives and how citizens could help the efforts of the allied forces fighting on so many fronts for freedom. It hasn't changed my beliefs on pacifism - it has just helped me to understand more of the circumstances and realities of those times.

Today, there is a multitude of media formats to keep us apprised of the seemingly countless conflicts of the world. Despite all the hardships and lessons of the past, there are still those who feel the only answer is to go to war over lands, possessions and beliefs.

Why can't we find non violent ways to resolve the differences?

Why can't we learn to accept each other equally?

Why can't we learn to share?

Why can't we learn to be tolerant of others, 
regardless of our languages, religions, beliefs and abilities?

My heart breaks for those who have had to endure war. For the innocent victims of war. For those who have lost their lives in the pursuit of freedom and equal rights for ALL citizens. For those who have lost friends and loved ones. For those families who must cope with the absence of a loved one who is serving. For those brave souls who come home broken, scarred and disabled.

However, I choose not to wear a red poppy to honour those who have sacrificed so much for our freedoms.

If I were to wear a physical symbol of Remembrance Day, it would be a white poppy. A white poppy is a pacifists symbol of showing respect for, and remembrance of ALL victims of ALL wars. The word peace is written across the black center to symbolize a hope for the future.
I know that my opinions aren't shared by all and that some will be offended or feel that I am being disrespectful of those who serve. Not so. I am deeply grateful for the sacrifices they have made. With all of my heart and soul, I just wish that war and it's consequences were not even a possible answer to settling differences.
So, on this day of Remembrance, I stop to think of those who have given so much and to hope that someday, there will be Peace throughout the world.

dn

Sunday, October 28, 2012

Welcome to Post-Leaf, Pre-Snowbank Season!

The last couple of mornings, Winnipeggers have woken to a bit of the white stuff on the ground. Temps are hovering around 0C/32F which also means that it is icy on streets and sidewalks. Friday morning there was a 20 car fender bender on a city overpass. Not a fun way to start the day!

It's too early for this right? Nope! Not in this prairie burg!

The season of fall started on September 22 - just over five weeks ago. Supposedly, the season is to last until December 21 when winter officially begins.

Now that time frame may actually apply in some rare lands, but here in Southern Manitoba, the season of fall doesn't follow the rules. Well to be honest, none of the seasons really do but today I'm specifically referring to fall.

Our leaves can start tuning in late August and be almost gone by the official start of fall. We can have skiffs of snow by late September or early October. We can have snow on the ground by mid October that - horror of horrors - STAYS till spring!!

It seems that every year is a bit different. Does Mother Nature flip a coin to decide when our leaves will turn colours? Then another one to see when they will all fall to the ground and a third to see when the first snowfall settles indefinitely on our land?

She may be the ruler of the seasons, but I suspect that the four seasons play some sort of cosmic weather game with her over their respective territories in order to reign supreme in her eyes. They try to sabotage each other by making it snow in June or melt in February. They send frost or a late snow to delay spring or a massive wind and frost to speed up fall.

Why can't they all get along and just let people enjoy the respective seasons rather than playing games with our environment?

I imagine that their answer would be that this keeps things interesting for them and supposedly for us! Heaven forbid the meteorologists actually figure out all of their tricks and be bang on with the forecast every time! What would be the fun in that?

Well, I for one could use a little boring when it comes to the weather of the four seasons. I don't mind a little tweaking to cool things down in the heat of summer or to warm things up a smidge in a bitterly cold winter. What I don't like is the teasing that goes on in spring and fall.

This year, our leaves were still relatively green the day before Fall started, Within a week or so, they had pretty much all turned colour. Only a few days later, the winds kicked in and the beautiful colours began to fall to the ground. We here in The 'Peg got a skiff of snow that melted within the day. Southeastern Manitoba got a nasty snowstorm that knocked out power to thousands. Some were in the dark for several days over the Thanksgiving weekend on October 8.
Yup, the true beauty of fall is fleeting. I'm glad I got out for my walk in the leaves when I did. Had I waited a few more days, I'd have been looking at barren branches and walking on soggy leaves.

We needed the rain but I really wish the multicoloured leaves had hung on the trees more than a few days. Now, the branches just look so empty and forlorn. Most of the birds flocked south weeks ago. Even some of the human variety of snowbirds have headed for southern climes already. They are getting out while the getting's good!

The prairie landscape is looking cold and bleak. The days are growing ever shorter. The lovers of warmer weather are complaining how cold it is. Cleaning up the leaves and gardens is either done or being left to mulch for spring. The winter snow lovers are chomping at the bit to get out for their winter activities.

It's the time of year when you really don't know how to dress. Okay, that happens several times a year in these parts, but this post is about fall. It is still a bit too warm to be pulling out the long-johns, winter coats and scarves. But, you need more than a light jacket and a hoodie. Under-dress and you'll catch one heck of a nasty cold. Overdress and you sweat like crazy then catch a chill when you strip down and head out again. It is a delicate balancing act that can easily go either way.

Even the hint of precipitation can mean snow if the conditions are right. The question is - will this be the snow that stays? As much as I dislike how the snow and inevitable ice patches limits my mobility, there really is a freshening beauty to the white stuff - in moderation of course! Let's not overdo the snow love here - especially only five weeks into fall!

If I had my way, fall - and all of its leafy beauty would truly last more than a couple weeks! It would last a good two months or more! The snow can jolly well wait it's turn in the winter season.

Heck, if it were REALLY up to me, it wouldn't snow till Christmas Eve and then it would melt on January 2!!

Alas, Mother Nature and her four feuding sibling seasons don't give a fig what I or anyone else wants. They remind us of this every chance they get.

I know there is no real point in lamenting the all too short beauty of fall but sometimes it just feels good to blow off a little steam and vent about the things we can't change. 

Mother Nature, I'm sorry if I have offended you or ticked you off. It is nothing personal - I swear!

Oh, one more thing - can you please hold off on any more of the white stuff for just a little longer? I haven't gotten all my winter supplies in my pantry yet. I'm not quite ready to hunker down for hibernation.

Yeah, I know - we'll get the snow when you decide we get the snow. Oh well, never hurts to ask!

dn

Sunday, October 14, 2012

PB Apple Chippers


Last fall, I came across a recipe for “Apple Peanut ButterCookies” on the Taste Of Home site. It sounded interesting and had gotten some good reviews. Since I love Peanut Butter and Apples, I thought I would give this recipe a try - with a few of my own adjustments of course!

The original baking temp was 375F but I found that a bit too hot and the cookies were over-baked around the edges so I reduced the temp to 350F which resulted in a much more even bake. I altered the proportions of shortening and Peanut Butter from 50/50 to 25/75. Rather than using all purpose flour entirely, I did a 50/50 split of all purpose and whole wheat. I reduced the cinnamon slightly as I am not a huge fan of cinnamon and didn't want it to overwhelm the other flavours. I upped the quantity of grated apple. And of course I added chocolate chips!

After all. what could be more tempting than a combo of Peanut Butter, Apple and Chocolate!?!

The result was a soft, flavourful cookie that is perfect to serve anytime with a nice cold glass of milk or a mug of hot chocolate!

PB Apple Chippers


1/2 cup shortening
1 1/2 cup chunky peanut butter
1 cup sugar
1 cup packed brown sugar
2 eggs
1 teaspoon vanilla extract
1-1/2 cups whole wheat flour
1-1/2 cups all-purpose flour
1 teaspoon baking soda
1/2 teaspoon salt
3/4 teaspoon ground cinnamon
1 1/4 cup grated peeled apple, firmly packed (3 medium, peeled cored and grated)
1 cup crushed peanuts
2 1/2 cups mini chocolate chips

In a large bowl, cream the shortening, peanut butter and sugars until light and fluffy. Beat in eggs and vanilla. Combine the dry ingredients; gradually add to creamed mixture and mix well. Stir in apple, peanuts and chocolate chips.

Drop by rounded tablespoonfuls 2 in. apart onto baking sheets lined with parchment paper. Bake at 350° for 10-12 minutes or until golden brown. Do not over-bake! Cool for 5 minutes before removing to wire racks. Makes about 9 dozen.

Enjoy!

dn